


Recently I moved into a new home studio space and decided to get a Platform desk made by Output. It lets you rack-mount your gear, there’s a cable management system, a MIDI keyboard tray, and as far as studio desks go, its pretty affordable. I was loving the desk but then I ran into an issue I did not anticipate.
I invited a producer friend to come work on some music and in my old studio space, with all the cables plugged into my computer, out in the open, and easily accessible, I could just unplug them from my laptop and plug them into someone else’s computer. My studio space looked like a disaster, but every cable was right there.
In my new space, with all my cables wrapped up behind my desk, and not easy to gain access to, getting this producer’s laptop connected to my system turned into a 10 or 15 minute ordeal, where I was behind my desk, unplugging and untangling cables, which was a huge waste of time.
After this experience I decided there had to be a better way to go about allowing guest producers that I brought into my studio to connect to my system. I did a little bit of research online and a found a couple great solutions.
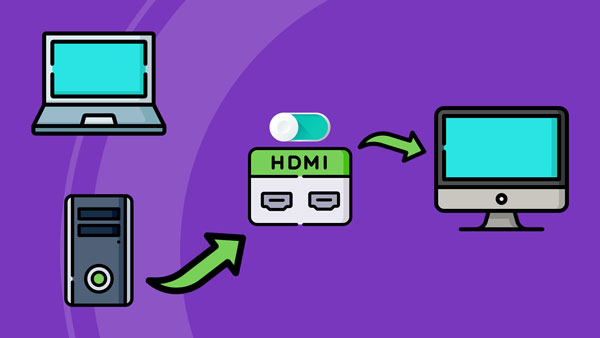
1. Use an HDMI Switch
To give people the ability to toss their screen onto my main computer monitor, I set up an HDMI switch. One HDMI cable is plugged into my computer, and another HDMI cable is snaked through my desk, ready for someone to plug into. These two cables are connected to one side of my HDMI switch, and the output of this switch is connected to my monitor. When I press the button on the switch, I can toggle between screens.

2. Integrate a USB Switch
By plugging my keyboard, mouse, and MIDI keyboard into one side of a USB switch, and connecting a different computer to each of the switch’s outputs, I can quickly toggle between which computer has control of these peripheral devices. If your audio interface uses a USB connection, you can connect it to this switch as well.


My particular audio interface uses a Thunderbolt 3 connection and after spending days looking for a Thunderbolt 3 switch online, it doesn’t look like they exist. It seems that due to the complexity of Thunderbolt 3, creating a Thunderbolt 3 switch isn’t a very straightforward process.


You might be able to find some USB switches online that use USB-C ports, which are the same ports used by Thunderbolt devices, but it doesn’t necessarily mean these switches support Thunderbolt. You need to keep in mind that while Thunderbolt devices use USB-C connectors, not all devices that use USB-C connectors support Thunderbolt.
Until a Thunderbolt 3 switch is created, this is the one and only cable I have to unplug from my computer when I invite other producers over. It’s not ideal, but it’s much less work than what I had to go through before.
3. Get a Cable Clip
To hold these different cables in place and stop them from slipping through the hole in my desk, I’ve used a cable clip that I got as part of a pack off Amazon. This particular clip sticks to my desk so I don’t have to worry about it moving around.

Even if you don’t collaborate with other music producers that often, it still might be worth looking into an HDMI switch and USB switch if you own a desktop computer and a laptop. If you need to do some work on your laptop, it’s nice to be able to quickly connect to your more elaborate setup and make use of your peripheral devices, like your keyboard, mouse, and computer monitor.


