


A mastering digital audio workstation (DAW) is built specifically for streamlining the process of mastering EPs and albums; it contains features that general purpose DAWs lack. We’ll be taking a look at Steinberg’s WaveLab Pro 10, which is one of the most popular mastering DAWs amongst mastering engineers, and investigating 6 benefits of using a mastering DAW.
Do You Need a Mastering DAW?
For mastering singles that you plan to release through streaming services, the DAW that you write music in is probably sufficient enough to meet your needs. However, if you work as a mastering engineer, or plan to work as a mastering engineer in the future, purchasing a dedicated mastering DAW is something to consider.
In general, a mastering DAW is going to increase the speed at which you’re capable of producing masters. The less time you need to spend mastering, the more masters you can get done. Many engineers charge a flat mastering fee instead of billing by the hour; what more incentive do you need to streamline your mastering workflow?
1. Loudness Level Matching
If you’ve ever tried to master more than one song in an Ableton or Logic session, you’re familiar with how chaotic the process is. Trying to hit target LUFS values across multiple tracks is a nightmare; tweaking the settings of all your compressors and limiters is extremely time consuming.
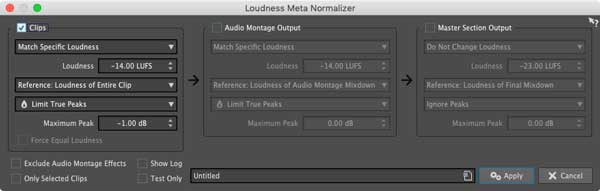
Mastering an EP is doable within a basic DAW, but when you’re working on an album containing 12-20+ songs, you’ll end up wasting hours dealing with LUFS levels. Wavelab Pro 10 provides a solution to this problem with its Loudness Meta Normalizer feature. It matches the loudness of all your clips to either the loudest clip you’ve selected, or a target LUFS value.
Currently, Apple Music with Soundcheck activated plays back tracks at -16 LUFS. Amazon Music, Spotify, and Tidal play back songs at -14 LUFS, and YouTube plays back audio at -13 LUFS. Songs above these values are attenuated, making it pointless to make songs loud for the sake of being loud. There's definitely something to be said about heavily compressing a song as a stylistic choice, but that's another discussion altogether.
When mastering a single, your best bet is to compress the track to a point that sounds subjectively “good,” then release it as is. The normalization processes applied by streaming services will do their thing and there’s not much to worry about. The whole point of loudness normalization is that your song should sound just as loud as everything else, so there’s no point in maximizing loudness at the expense of audio quality.
Mastering an album is a little different because if one song is hitting -14 LUFS and another is hitting -6 LUFS, that’s a clear sign that the songs have been mixed very differently and although the loudness algorithms they get hit with should normalize them, they’re still going to sound very different from one another.
Also, if you were to burn these tracks to a CD, the track clocking in at -6 LUFS would sound drastically louder than the -14 LUFS track since there’s no LUFS normalization process that takes place automatically. In this situation, it would make sense to normalize all the tracks on the album to a similar LUFS value.
Another instance in which hitting LUFS targets is important is when you’re mixing audio for a streaming service like Netflix. Unlike iTunes and Spotify, Netflix will actually reject your submission if the audio synced with the video doesn’t meet their LUFS requirements.
2. Clip Processing
Almost any DAW is going to allow you to apply plugins to tracks, but not every DAW allows you to apply plugins to clips. While mastering, this is a particularly important ability to have. It’s quite common to process the chorus or drop in a song differently than the verses or buildups.
It’s possible to toggle plugins on and off at different points in a song, using Ableton or Logic, but this can be rather time consuming. If you split a track into different clips consisting of the intro, verses, pre-choruses, and choruses, you can copy and paste processing to them with very little fuss.
For damaged recordings that require restoration, Wavelab Pro 10 allows you to highlight a clip and quickly open it within an external audio editor like iZotope RX. When you save the RX session, the file is instantly updated in Wavelab. While mastering, this level of accessible power is awesome.
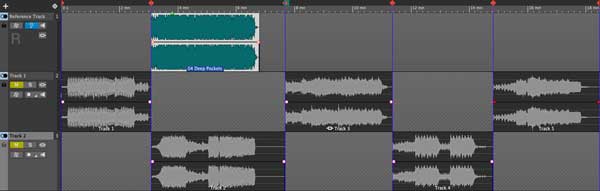
3. Reference Track Handling
Reference tracks are a brand new feature in Wavelab Pro 10 that allow you to hear how your songs stack up against commercial releases. They allow you to seamlessly toggle between your material and a reference without the introduction of pops, clicks, or other artifacts.
For mastering singles, ADPTR AUDIO’s Metric AB plugin handles reference tracks phenomenally. It lets you load up a reference track, level match it with your source material, and analyze both tracks through dual or layered mastering meter displays.
If you’re mastering for a format like CD, it’s important that you line up your tracks in a linear fashion to get a sense of how they’ll play into one another; this is where Wavelab’s reference tracks become extremely useful.
Metric AB becomes somewhat tedious to use when you’re dealing with multiple tracks. When you switch between reference tracks within the plugin, you need to re-match loudness levels. Wavelab’s reference tracks allow you to line up as many references as you need and level match every track in your session at once with the Meta Normalizer.


4. Metadata Editing
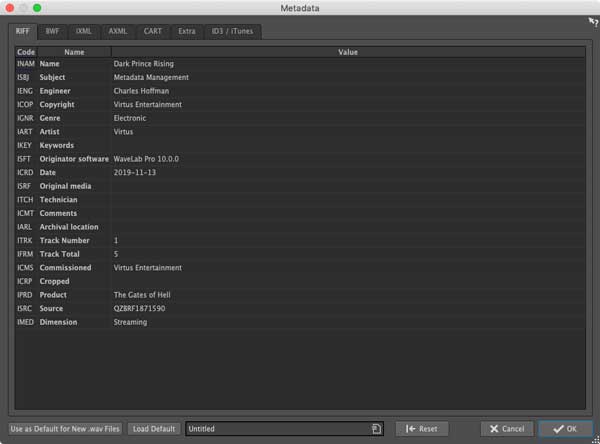
As a mastering engineer, one of the things you’re responsible for is editing a song’s metadata, which describes and gives information about the song. This includes everything from the song’s name, the song’s artist(s), the album title, and even the record label the song is being released through.
You can add a very limited amount of metadata to a song through iTunes, but a mastering DAW allows you to edit metadata in depth. It’s possible to add things like the mastering engineer’s name, the software used to master the song, the entity that commissioned the work, ISRC codes, as well as the intended destination format.
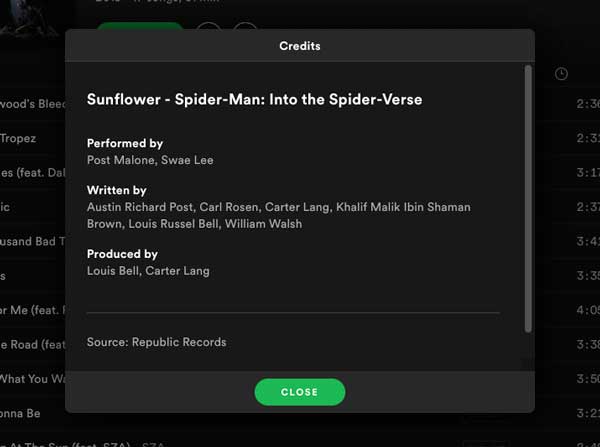
Streaming services like Spotify rely on metadata to credit performers, songwriters, and producers. For example, “Sunflower - Spider-Man: Into the Spider-Verse” is performed by Post Malone and Swae Lee, but has 6 different songwriters and 2 different producers credited on it. Ensuring that all of a song’s metadata is filled out will guarantee that all parties involved with the creation of a song are credited properly.
Metadata is often entered manually when uploading a song through a music distributor like Distrokid. In some cases, you may fill out the metadata fields yourself when uploading, and in other situations, someone else may do it. Making sure your masters include the correct metadata improves the chances that the person uploading the song to streaming services inputs the correct information; they can copy and paste the metadata directly from the master to the music distributor's website.
Metadata helps keep things organized, especially for albums that include various performers, writers, and producers.
5. DDP Image Creation
Disc Description Protocol (DDP) is an error-protected delivery format that is used to send information about songs to CD and DVD manufacturers. A DDP image contains information regarding track numbers, CD-time, song duration, song titles, performers, songwriters, composers, arrangers, and ISRC codes.
Fundamentally, this is metadata that can’t be edited once it’s been created, which ensures that your CDs and DVDs end up with the right information on them. When you’re manufacturing 100,000 copies of a CD or DVD, as a manufacturer, you don’t want an employee screwing up the track info; this is a huge expense. Pulling information directly from a DDP image helps prevent manufacturing errors.
Most normal DAWs don’t allow you to create DDP images, whereas Wavelab Pro 10 does. It also includes a DDP Player that your clients can download for free; it allows them to double-check the contents of DDP images before you submit them to a CD or DVD manufacturer. Steinberg’s DDP Player includes a peak meter and RMS meter, and is fully supported on both PC and Mac.
Download Steinberg's DDP Player for free and check it out for yourself.
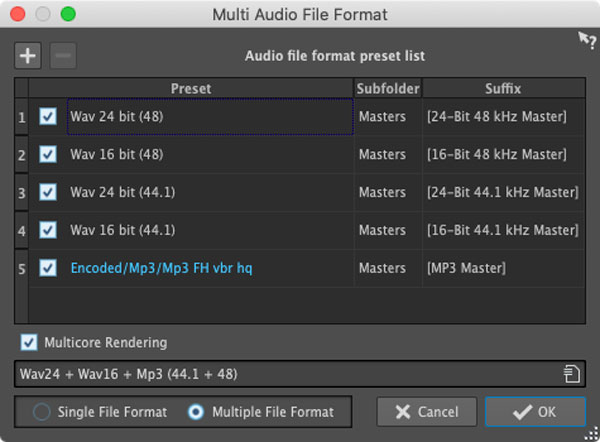
6. Multi-Format File Exports
Perhaps the most notable Wavelab feature of them all is the ability to export multiple file formats at once. In Ableton you can bounce one WAV file and one MP3 at the same time, but what happens if you want to export a 24-bit WAV file and 16-bit WAV file? Unfortunately, you need to run the export process twice. If you also want 48 kHz files in addition to 44.1 kHz files, you’ll need to run the export process two more times.
This isn’t a big deal when you’re mastering one song, but when you’re mastering multiple tracks every day, and working with clients requesting multiple file formats for entire albums, it’s a catastrophic waste of time.
In Wavelab, I can bounce any number of bit depth and sample rate combinations I like, all at once, along with an MP3. Instead of sitting at my computer, running the export process multiple times manually, I can load up a custom file export preset, and render all the audio file formats I need while making myself a cup of coffee.
If you do a lot of mastering work, Wavelab is really awesome, but since it’s a little different than other DAWs, there’s a bit of a learning curve. Also, since it’s more a niche thing, you’re not going to find very many tutorials on YouTube explaining how to use it. This means you should definitely read through the documentation it comes it. This is a bit of an undertaking, but it’s the sacrifice you need to make for all these cool features.
Want to produce radio-quality songs? Check out Black Ghost Audio's Music Production for Beginners video course. Produce three songs from start to finish and learn the skills you need to write, record, mix, and master music at home. No experience required. Click here to learn more and produce your first song in under an hour.


