
If you mix your songs using headphones, I've got some good news for you... A lot of people are under the impression that mixing with headphones is "worse" than mixing with studio monitors, but that's not necessarily the case. I'm going to demonstrate how to overcome some of the challenges of working with headphones so that they'll blow the speakers set up in your bedroom out of the water.
So, how does mixing with headphones compare to mixing with studio monitors? Well, when listening to music using a pair of studio monitors, the sound produced by your left speaker can be heard by your left and right ear, and the sound produced by your right speaker can also be heard by both ears—this phenomenon is known as acoustic crosstalk and it helps your brain correctly perceive stereo images.
When listening to music using a pair of headphones, this crosstalk doesn’t take place—you’re left ear hears the signal produced by the left speaker in your headphones and your right ear hears the sound produced by the right speaker.
Your brain ends up relying entirely on the level differences between the left and right channel of an audio file to make sense of the stereo image. The result of this is a really poorly defined stereo image that sounds like individual sounds are laid out along a line running directly through the centre of your head, as opposed to spread out in front of you, in the way that they are when listening to music using a pair of studio monitors.
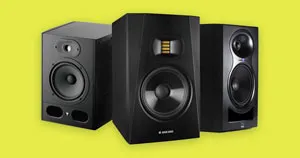
Mixing music using headphones isn’t necessarily worse than mixing with studio monitors. There are some other factors you need to take into consideration as well. When you’re mixing with a pair of studio monitors your room will drastically affect your ability to make informed mixing decisions.
Acoustic problems like first reflections, secondary reflections, flutter echo, and room nodes can drastically throw off your perception of a mix. Your mix might sound nice and balanced within the space you’re in, but since the signal you’re hearing is colored so heavily by your room, it’s probably not going to translate very well to other playback systems.
For example, if a room node is creating a 12 dB bass boost at your listening position, you’re probably going to set the level of your bass quieter than you should to accommodate what you’re hearing. Within your room, your mix is going to sound balanced, but when you play your mix through another playback system in a different space, it’s probably going to be lacking a ton of low-end, especially if you’re unaware of how your room is coloring your mix.
Acoustic treatment will help you achieve a flat frequency response at your listening position, which will minimize the deviation between how you perceive mixes on your system versus how other people perceive mixes on their systems. Unfortunately, treating a room properly, and getting it to a point that’s functional can cost thousands of dollars. You may not want to spend that kind of money, or if you produce music in your bedroom, you may not want to hang acoustic treatment all over your walls.
For this reason, I’m going to make the bold claim that it’s often better to mix and master your music using a pair of headphones, as opposed to studio monitors. I think that if you’re working in an untreated space, you’ll see far better and more consistent mixing results if you rely on headphones because they take the room out of the equation.
Now I’m going to show you how you can make the most of your headphones and overcome some of their flaws.
1. Mix in a Virtual Studio
Thanks to recent advancements in technology, it’s now possible to replicate acoustic crosstalk while listening to audio through headphones. Essentially, some of the left channel is fed to the right channel, and vice versa. It’s a bit more of a complex process than that, but that’s the general idea.
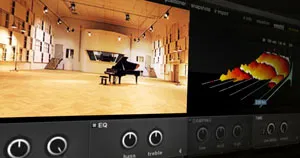
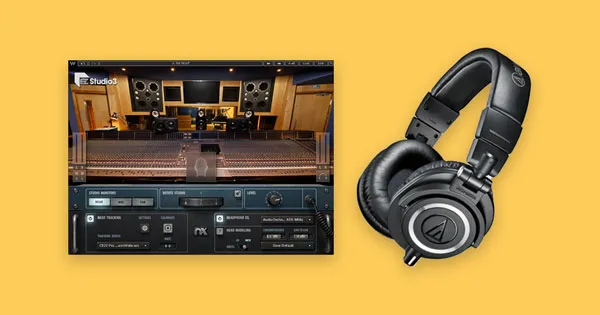
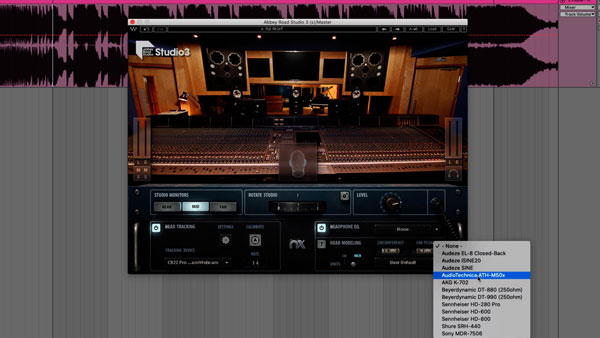
If you don’t have access to a professionally sound-treated studio, Waves’ Abbey Road Studio 3 plugin provides a solution. It emulates one of the mixing rooms at Abbey Road Studios in London, while generating acoustic crosstalk.
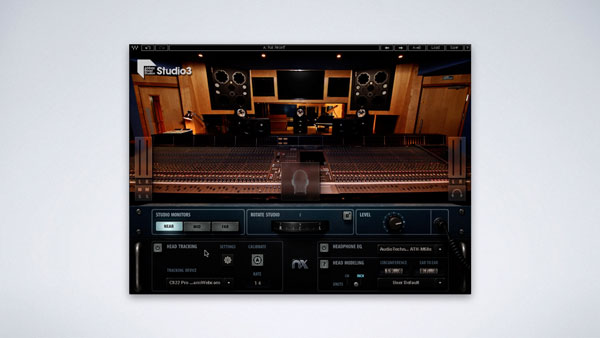
The plugin is based on 360° impulse response measurements of the Studio 3 control room at Abbey Road Studios, so it’s meant to capture the audio qualities that make up that space. Using this tool, you should be able to hear your mixes with enhanced clarity and detail, along with well-balanced sustain across the frequency spectrum.
There are also some cool controls you can take advantage of. You’re able to switch between a set of near, mid, and far-field monitors, which provides three different listening experiences.
One of the other cool features is that you can rotate the virtual control room 360 degrees, so that your head is angled in various ways in relation to the virtual speakers. Using Waves’ NX plugin, you can use a webcam to track your head movements so that the room rotates automatically when you turn your head.
For even better results using Nx, you can get a little device called the Nx Head Tracker that clips onto your headphones and controls the software based on your head movements.
Up to six people can use Nx head trackers at once so if you’re in a studio session with two other people, you can all listen to a mix with your own Nx head tracker. To set this up, you route your mix to a master aux bus, and then create three auxes for Nx monitoring.
Drop an instance of Abbey Road Studio 3 on each aux, and then connect each person’s head tracker to their own instance of the plugin. Aux one gets routed to headphone out 1/2, aux 2 gets routed to headphone out 3/4, and so on. When each person moves their head, their individual virtual control room will rotate, while leaving the rotation of other people’s control rooms unaffected.
2. Use a Headphone EQ
Typically, you should audition your mixes on a variety of headphones. Headphones uniquely color the sound they produce; some more than others. Colorful headphones are less than ideal for mixing and mastering purposes because they’re deceiving.
For example, Beats by Dre are terrible for mixing because of how much they boost low-end. When consuming music, colorful headphones are fine and can actually enhance the listening experience, but this isn’t a quality you want in a pair of headphones used for mixing. It’s easier to make informed mixing decisions when your headphones are revealing and make everything you hear sound clear and balanced.
By checking your mixes on multiple different headphones, you’ll get a sense of how your songs will sound on different playback devices, which is good, but the big issue here is that you may have just one or two pairs of headphones; one open-back and one closed-back.
Using a headphone EQ, you can remove coloration from your headphones to create a flat-response listening experience. This will save you a lot of time and prevent you from having to check your mix on tons of different systems.
There’s actually a headphone EQ built into the Abbey Road Studio 3 plugin that will apply an EQ compensation curve to the audio you’re listening to, based on the headphone model you select.
With issues involving acoustic crosstalk and frequency response taken care of, you need a really tight and dialed in studio setup to compete with the virtual mixing environment provided by Abbey Road Studio 3.
I’ve sound-treated my entire home studio, optimized speaker placement, and pretty much done everything I can do to the space I’m in, within reason, to make the audio I’m hearing sound as pristine as possible.
Having done all of this, I’m still checking my mixes on my headphones using Abbey Road Studio 3 before mastering them because it will sometimes reveal things that I’m not hearing otherwise. If I notice an issue, I can quickly fix it, and then print my mix.
3. Check Your Mixes on Consumer Earbuds
You spend hours mixing your tracks to perfection through high-quality headphones, but the reality is that most people listening to your music will be listening to it through low-quality consumer earbuds and speakers. Instead of neglecting the majority of your audience, consider catering to their listening situations.
When you put together an excellent mix, you don’t need to sacrifice its quality so that it plays back well on consumer devices, but there are a few things that you want to make sure are translating well to consumer devices like ear buds.
Low-end that sounds powerful on studio headphones may be completely inaudible on consumer devices. Bass that lacks upper harmonic content typically doesn’t come through very well on speakers that lack low-end; if your track contains a funky bassline that’s the backbone of the song, this is a serious issue.
Bass that uses heavy distortion to cut through the midrange of a mix is often audible on consumer devices. It’s not the low-end that you’re hearing, but instead, the upper harmonic content that allows your brain to perceive a phantom fundamental frequency, below the frequency response of consumer devices
Try distorting your bass yourself with a plugin like Waves’ Abbey Road Saturator by boosting the gain. For a more subtle effect, you can use a tape saturator like Waves’ J37. Turn up the input level until you get the amount of saturation you’re looking for, and then toggle between different formula, speed, and bias settings to get the tone you’re looking for.
4. Check Your Mixes in Mono
Similar to how your mixes generally sound different on studio monitors in comparison to how they sound on headphones, they also sound different when summed from stereo to mono. Plenty of consumer devices and large venues use mono playback systems, which places importance on mono compatibility.
Slapping a utility on your mix bus to audition your track in mono is easy enough, but what are you meant to listen for? Two issues you may experience include a loss of energy in specific frequency ranges, or complete phase cancelation resulting in missing track elements; the latter issue being much less common, and typically the result of phase inverted stereo mixing techniques.
Some mono compatibility issues can be fixed while mastering, depending on the severity of the problem. For example, it’s possible to tweak the frequency response of a stereo mix so that it plays back well in mono using an EQ. With your track summed to mono, drop an EQ like the Waves F6 Floating-Band Dynamic EQ on your master channel and apply EQ boosts/cuts where necessary to balance the frequency response or your mix.
Bypass the utility you’ve applied to put your track back into stereo, and then re-assess how your mix sounds. You want to strike a balance between a mix that sounds balanced in stereo and mono. Don’t forget to perform this process while using Abbey Road Studio 3 with the built-in headphone EQ engaged so that you’re making informed mastering decisions.