


A compressor reduces the dynamic range of the track it’s been applied to; both regular compressors and sidechain compressors do this.
The difference between a regular compressor and a sidechain compressor is that a regular compressor responds to the level of the audio signal of the track it’s been applied to, and a sidechain compressor responds to the level of another track.
Many compressors have a sidechain circuit that you're capable of engaging that allows them to act as a sidechain compressor. This means that most sidechain compressors can act as regular compressors, but not all regular compressors can act as sidechain compressors.
I'll be showing you how to sidechain your kick to your bass using Ableton's Glue Compressor. This will provide your kick with more space in your mix, and result in a kick that is clean and punchy.
The reason I'm using Ableton's Glue Compressor instead of Ableton's Compressor is that I like the sound of the Glue Compressor more. There are also a limited number of attack, release, and ratio values that you can choose from, which makes dialing in appropriate settings much less intimidating.
If you prefer to use Ableton's Compressor instead, go for it. All of the following steps apply in exactly the same way.
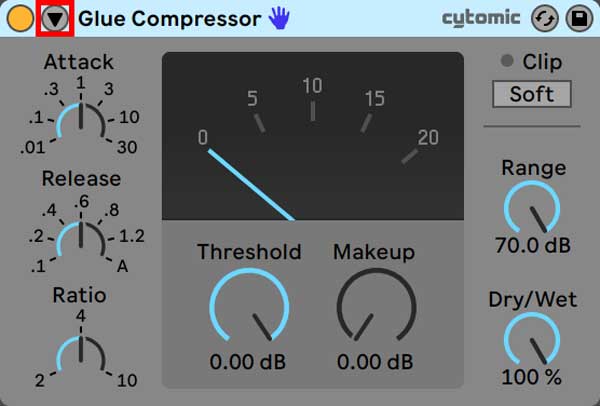
1. Load Ableton’s Glue Compressor onto the Track You Want to Compress
Drag and drop Ableton’s Glue Compressor, found under the Audio Effects tab, onto the track you want to apply compression too. This is the track that you’ll be ducking out of the way for another element in your mix.
For example, if you’re trying to make room for your kick, apply the Glue Compressor to your bass.
2. Click the Sidechain Toggle Button
Ableton’s sidechain compression pane is hidden behind a sidechain toggle button. Click this button to display the sidechain circuitry options.
3. Enable the Sidechain Input
You need to enable the Glue Compressors sidechain circuit by engaging the “Sidechain” button. To do this, click on the “Sidechain” button so that it’s highlighted in yellow.
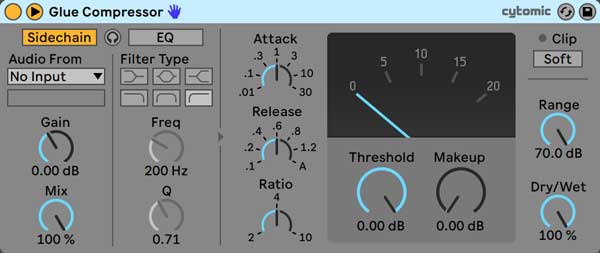
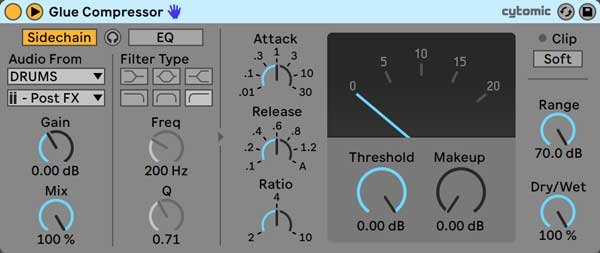
4. Select a Sidechain Input Signal
Under “Audio From” there are two dropdown menus. The top dropdown menu says, “No Input,” and the bottom dropdown menu is empty; these menus are where you select the external source and tapping point.
If you wanted to tap signal from a kick drum that’s part of a drum rack you would select the track containing the drum rack in the upper dropdown menu, and the kick apart of the drum rack in the lower dropdown menu.
You’ll have the option to choose whether to tap the signal pre FX, post FX, or post mixer. In most situations, I’ll tap the signal post FX so that all the processing applied to the source track is applied to the sidechain input signal.
This also lets me manipulate the level of the track I'm tapping signal from within Ableton’s Mixer Section without affecting the level of my sidechain input signal. If you choose to tap the signal post mixer, this would not be the case.


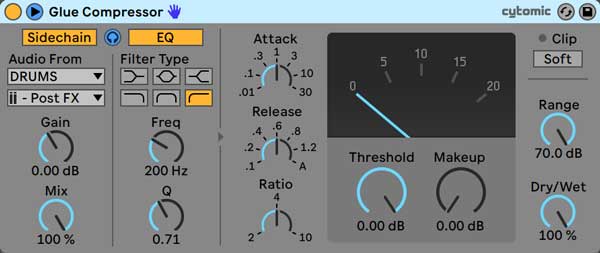
5. Enable the Sidechain EQ
You can filter the sidechain signal by enabling the “EQ” button and choosing one of the 6 available filters.
To dial in these settings, click on the Sidechain Listen button, which is the small button marked with a set of headphones between the “Sidechain” button and “EQ” button.
You’ll be able to audition the sidechain signal and listen to how the filter you’ve selected is affecting it.
6. Filter the Sidechain Input Signal
Filtering the sidechain signal is useful if its inappropriately triggering the compressor. For example, the low-end of the kick being fed through the compressors sidechain circuitry may sustain for a long time, and cause the compressor to stay clamped down on your bass for a period that doesn’t sound good.
To overcome this issue, you can apply a high-pass filter and cut away the frequency content below approximately 200 Hz. This will cause just the transient part of the kick to trigger your compressor, and solve the problem; the result is a much more responsive form of sidechain compression.
IMPORTANT: Keep in mind that filtering the sidechain input signal doesn’t filter the signal of the track that the compressor has been applied too. The sidechain input signal is being tapped from a point in another track’s signal flow and this is the signal being filtered.
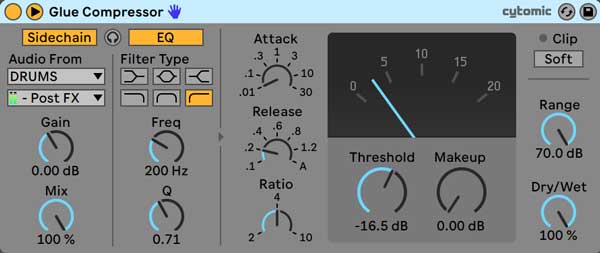
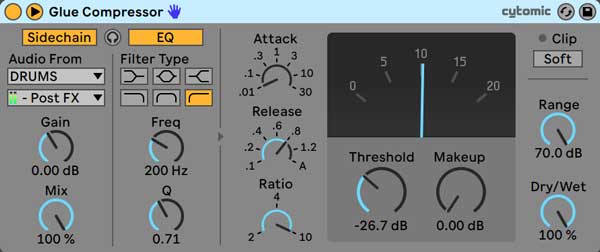
7. Set the Attack, Release, Ratio, and Threshold
Now you can start dialling in the attack, release, ratio, and threshold of the Glue Compressor. If you’re unfamiliar with these parameters, I recommend checking out “The Ultimate Guide to Compression.”
Getting these settings right is incredibly important whether you’re shooting for natural, transparent results, or aggressive pumping effects.
The source material you’re working with will have an effect on the attack, release, ratio, and threshold you should use. Most people want to learn how to use sidechain compression to make room for their kick, so that’s what I’ll be demonstrating how to do.
Applying Natural Sidechain Compression
For natural results, start with a ratio of 2:1 or 4:1, an attack time of 0.1 ms, and a release time of 0.2 s. If you want the initial part of the kick’s transient to be less defined, turn the attack time up, and if you want the tail end of the kick’s transient to be more present, turn the release time up.
Please note that if you turn your release time up too much, your bass will sound as though it’s pumping or swelling after your kick plays. When applying natural sidechain compression, you want to minimize this type of pumping effect by using a short release time.
Gain reduction is applied by lowering the Glue Compressor’s threshold level. A gain reduction amount of 2-3 dB is a good starting point, but you can apply more gain reduction by reducing the threshold further.
Applying Aggressive Sidechain Compression and Pumping Effects
Many music producers like using LFO Tool, VolumeShaper, or Chain Shaper to apply rhythmic pumping effects to their music. However, Ableton’s Glue Compressor can perform a similar type of processing when placed into sidechain mode.
To achieve this effect, start with a ratio of 4:1 or 10:1, an attack time of 0.1 ms, and a release time of at least 0.4 s. The more gain reduction you apply by lowering the threshold level, the deeper the pumping effect will be.
The big challenge here is getting your compressor to apply gain reduction in a way that is musical. The tempo of your song dictates the speed at which your compressor should be releasing the compressed signal. Toggle through the available release times and leave this setting where it “feels” the best.
Since Ableton’s Glue Compressor uses a pretty responsive gain reduction meter, you can watch how the needle behaves to gain some insight on whether or not your settings are set appropriately. Is the needle jumping and falling as quickly you envision the bass compressing? Use the needle as a visual cue, but ultimately trust your ears.
8. Don’t Apply Makeup Gain
It surprisingly often that I’ll open a clients project and see they’ve applied makeup gain within their sidechain compressor. The whole point of using sidechain compression is to make a signal quieter. Cranking the level up afterwards partially defeats the purpose.
There are situations in which using makeup gain may be appropriate. Perhaps the level of your bass is too quiet, and you don’t feel like applying a separate Utility effect to bring the level up a few decibels.
It’s easier to set track levels before applying sidechain compression, but it’s not impossible afterwards. You can use makeup gain to boost the level, but keep in mind that you’ll likely need to apply more gain reduction and perhaps even modify the compressor’s attack and release time. Be conscious of the ripple effect your mixing decisions have on your mixing workflow.
I’ve given you all the tips, tricks, and techniques you need to use sidechain compression in Ableton. To master this mixing technique, you'll still have to spend time putting it into practice. Reading about it is one thing, but making use of it in a studio session is something else entirely.
Want to produce radio-quality songs using Ableton? Check out Black Ghost Audio's Music Production for Beginners video course. Produce three songs from start to finish and learn the skills you need to write, record, mix, and master music at home. No experience required. Click here to learn more and produce your first song in under an hour.


