


How many time have you made a mix that you were pleased with, but when you played it in your car, it fell apart? Your mixing ability will get you pretty far, but you'll eventually hit a wall. The equipment you use does matter, but this doesn’t mean that you have to spend a lot of money on new hardware. I’m going to show you how to drastically improve your ability to make your mixes translate to consumer speakers for as little as $10.
Many consumers listen to music using their earbuds, their phone, their laptop, and the sound system in their car. If you’re able to avoid sacrificing the quality of your mix on professional sound systems and simultaneously improve the listening experience for people using these consumer devices, you may as well mix accordingly.
Constantly bouncing different versions of your mix to audition them on your phone, laptop, and in your car, just isn’t convenient. This process maims your workflow and causes many people not to bother checking their mixes on these devices. The solution is to create a monitoring set up in your studio that will provide you with an accurate representation of how your mix will sound on a variety of consumer devices. I’ve put together some different tools and techniques you can use to accomplish this.
The Problem With Only Using Professional Studio Monitors
I’m going to give you an example of a situation in which testing my mix across multiple devices was useful. I was processing vocals for a song I had recorded, and through my studio monitors, the mix sounded great. The singer was articulate, gave a great performance, and the song was coming together nicely. When it got to the point where I tested the mix in my car, I realized I had de-essed the vocals way too much.
The problem was that this issue wasn’t apparent on my studio monitors, but it was glaringly obvious on multiple other devices that I later tested inside and outside of my studio. My studio monitors, in combination with my room, were providing an exaggerated frequency response around 7-8kHz that I had overcompensated for. Even if your mix sounds great on a single pair of monitors, there’s always the chance that it won’t translate well to other systems.
1. Listen to Your Mix Through Consumer Speakers
One of my favorite sayings is, “It’s not the gear, it’s the ear.” In many situations this saying holds true, but sometimes your gear is screwing you over. Being unable to approximate how your mix will sound on other systems is a huge issue. It’s like trying to draw a picture with your eyes closed. Whatever you draw will probably turn out looking somewhat like what you had intended, but you have no way of knowing what it looks like until you open your eyes.
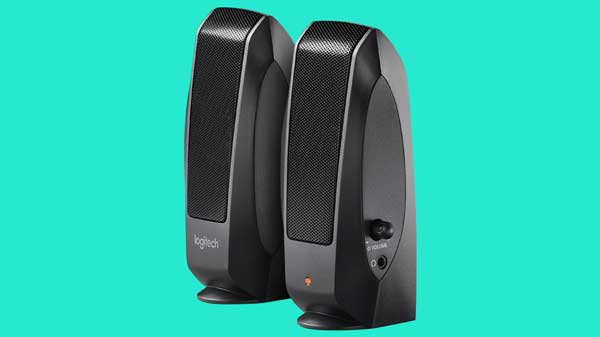
The cheapest way to deal with this playback problem is by integrating a pair of consumer speakers into your studio setup. The Logitech S120 2.0 Stereo Speakers are some of the most popular budget speakers on Amazon. They sound far from amazing, but that’s the point. Your listeners will be using all kinds of budget playback equipment, so having a piece of gear like this in your studio is a must.
The big emphasis with these speakers is convenience. It’s effortless to run your audio through them while you’re mixing, which means you’re much more likely to check your mix on them. You can connect these speakers to the headphone jack on your computer, and system audio will automatically be routed through them if you’re using a Mac.
Alternatively, you can get a 3.5 mm TRSF to dual 1/4” TS stereo breakout cable to connect the speakers to your audio interface or monitoring station. Make sure that your audio interface or monitoring station has switchable outputs so that you can A/B your mix between your main studio monitors and the Logitechs.
I’m not trying to convince you that these cheap Logitech speakers are some end-all solution for your mixing woes; they’re not. However, for $10 you’re going to at least get a taste for how your listeners will hear your song through their consumer speakers. If you’re on a budget, this is going to provide a significant monitoring enhancement to your home studio.
2. Monitor Your Mix Using a MixCube
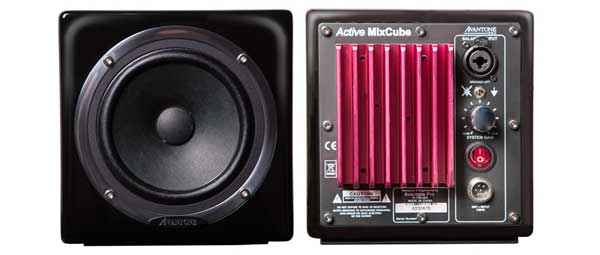
If your budget is higher than a meal at In-n-Out, you’re going to want to take a look at getting an Avantone Audio Active MixCube. In his article titled “Avantone Active MixCube” via Sound on Sound, Mike Senior says, “Firstly, its frequency response is very heavy on the mid‑range, which is the section of any mix that is most likely to survive to the listener: a comparatively limited number of playback systems manage serious low‑frequency output, and high frequencies are very easily lost if a playback device is heard off-axis or acoustically shadowed. The result is that if you get your balance right on an Auratone [I think this is a typo, and he meant to say Avantone] it's much more likely to translate across a wide range of speaker systems, both lo‑fi and hi‑fi.”


You may be wondering why this $249 monitor that’s known for not sounding “good” costs as much as it does. Well, Senior explains that this speaker is exceptional at communicating relative balance information about a mix, which is partially because there are no crossover artifacts and very few inter-driver phasing issues if you move around your room. Another benefit is that if you buy a single MixCube, there’s no inter-speaker phasing. Inter-speaker phasing may occur when using two monitors to create a phantom mono image, but since many engineers use just one of these monitors placed directly in front of them, inter-speaker phasing isn’t an issue.
To add a single MixCube into your set up, you'll need to pick up a 1/4" TRS to Dual 1/4" TRSF Y cable so that the left and right outputs of your audio interface or monitoring station sum together before entering the MixCube. If you instead decide to buy a pair of MixCubes, you won't need the Y cable, and you can connect the MixCubes as you would any other set of monitors.
3. Mix in a Flat Response Environment
Working in a room with a near-flat frequency response will help increase the chances that your mix translates well to the playback systems of your listeners. Each set of speakers on the market will deviate some amount from a flat frequency response. Some speakers will be missing low-end, while others may exaggerate the top-end of your mix. Achieving a quality mix in an environment with a near-flat frequency response will ensure that the character of other speakers impact your mix as minimally as possible.
Think back to the story about how I de-essed my vocals too much. It was partially a result of the fact that the space I was in had caused me to perceive a specific frequency range as too harsh. I overcompensated for this, and when multiple other systems and environments didn’t respond in the same way, I knew I had a problem.
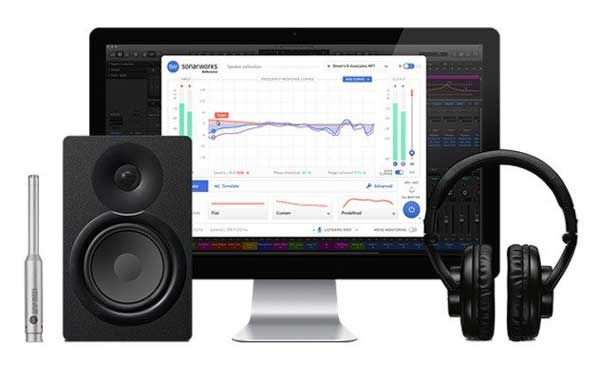
Sonarworks Reference is a software that analyzes the frequency response of your mixing environment using the Sonarworks XREF 20 microphone. The software then compensates for the non-linear frequency response of your room by applying corrective processing to your system’s output audio. Building a custom studio space with meticulous sound treatment and absorption would be ideal, but Reference is thousands of dollars cheaper and does an excellent job of improving your monitoring situation.
I’ve provided three different solutions for making your mix translate to consumer speakers. Each solution on this list eliminates the time-consuming task of having to bounce your mix out of your DAW and audition it on various devices. It's important to provide yourself with an effective monitoring solution that you can trust will translate well to other devices.
Want to produce radio-quality songs? Check out Black Ghost Audio's Music Production for Beginners video course. Produce three songs from start to finish and learn the skills you need to write, record, mix, and master music at home. No experience required. Click here to learn more and produce your first song in under an hour.


