


A compressor is a device that reduces the dynamic range of an audio signal. It does this by attenuating the volume of loud sounds (downwards compression), or by amplifying quiet sounds (upwards compression).
Seems simple, right? Well, that’s because it is! In this guide, I’m going to be going over the fundamental concepts you need to know in order to understand compression. I’ll also be covering all of the common controls found on a compressor, which will allow you to effectively operate one. I’ll be going over different types of compression, compression techniques, as well as my top 8 favorite compressors. Once you make it through this guide you’ll have an excellent grasp on the concepts surrounding compression, as well as the ability to tastefully apply compression to your mixes.
At the end of this guide, I’m going to link you to a resource that challenges some of the concepts I’m about to cover; it explains how compressors work in a bit more technical detail and doesn’t bother to simplify things. If you’re interested in diving into the real nitty-gritty of compression, I highly recommend checking it out.
1. Dynamic Range Explained
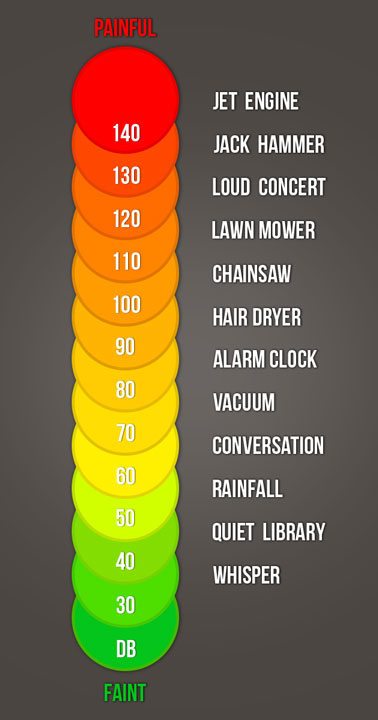
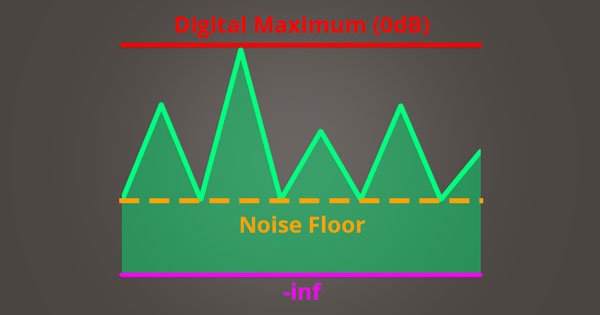
In regards to audio, dynamic range is the ratio of the loudest possible undistorted signal to the noise floor. The dynamic range of human hearing is generally 140dB (decibels). The threshold of human hearing is typically 0dB at 1000Hz, meaning that you won’t be able to hear anything quieter than that, and the threshold of pain is around 140dB at 1000Hz. The following image contains common sounds you’ve likely heard as reference points for this 140dB range.
When trying to distinguish a sound from its surroundings, a phenomenon called masking may occur, significantly increasing your minimum hearing threshold. Let’s say you’re having a conversation with your friend in a quiet library, sitting a couple feet apart. There may be some background noise such as an air conditioner (acting as the noise floor), but you’ll still be able to easily hear your friend.
Now imagine that you’re having a conversation with your friend but in a giant crowd of people who are yelling (acting as the noise floor). If your friend speaks to you at a normal level, their voice will be masked by the people yelling. The only way for you to hear them is if they yell louder than the people in the crowd.
The important thing to take away from this example is that the dB level of a sound is not what’s solely important in your ability to perceive it; the ratio of the sound to the noise floor is equally as important; this ratio is referred to as dynamic range.
For the rest of this guide, I’ll be talking about dBFS which stands for decibel units relative to full scale. dBFS is a unit of measurement for amplitude in digital systems that have a defined maximum peak level (like your DAW). Values that are smaller than the maximum are always negative values.
In the world of electronics, an amp with no volume control will play at full power all the time. The only way to control this is by applying an attenuator. An attenuator acts as a volume control by restricting the amp from playing at full power. When you turn up the volume on an amp, you’re actually reducing the restriction applied to the power.
The tracks in your DAW work similar to how amps work. By default, audio runs through each channel at maximum level (with the track fader set to 0dB). Only by attenuating this level are you able to control the level of the audio. Without the ability to attenuate sound passing through each channel, you’d be stuck with audio running at maximum level constantly; this is why your track levels reach from 0dB down to -inf.
2. Compression vs. Expansion
A large dynamic range will allow you to easily distinguish a sound from its noise floor without the risk of masking occurring. So why would you want to reduce dynamic range with the use of compression? Sometimes there are transients (sharp peaks in audio) apart of an audio file that are just too loud compared to the rest of the file; compression is one of the go-to ways of dealing with this issue.
The following diagrams demonstrate various types of compression and expansion taking place. I've kept these diagrams as simplified as possible with the sole intention of demonstrating what's happening to the audio signal (green) as it moves above and below the threshold (red). I'll get into more detail regarding how to manipulate compressors in section three. In the meantime, just focus on how the signal is reacting to the applied compression/expansion as it moves above and below the threshold in each scenario.
Downwards Compression
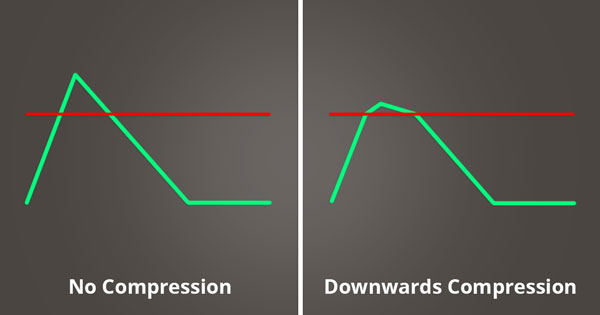
Downwards compression attenuates the volume of a signal when it reaches above a threshold; it reduces dynamic range. Imagine you’ve recorded yourself speaking into a microphone at a consistent level, but at a certain point you get excited and yell into the microphone. Anyone listening to this audio file is going to fall out of their seat because they weren’t expecting the volume to increase in the way it did.
The solution here isn’t to avoid yelling, it’s to attenuate the gain of your audio file when it increases above a certain level. One of the easiest ways to accomplish this form of gain reduction is by using a compressor. A compressor will reduce the level of your voice when it becomes too loud, and provide you with a less dynamic, and more dynamically consistent audio file.
Upwards Compression
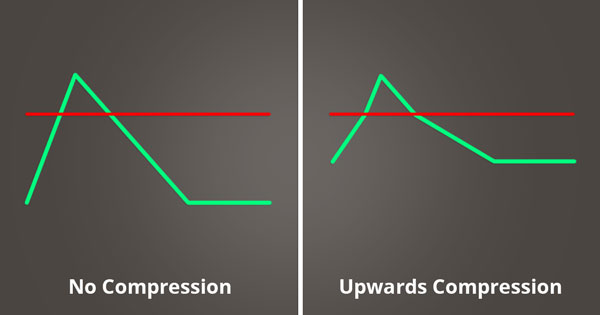
Upwards compression boosts the volume of a signal when it reaches below a threshold; it reduces dynamic range. Let’s say you’ve just scavenged through Splice, used up all your credits, and now have a whole bunch of drum loops to use in your tracks. You find the perfect drum loop, load it into your track and BAM! The hi-hats in the background are too quiet… Don’t worry about it, upwards compression can fix this.
By setting the threshold right above the level of your hi-hats, and right below the other drums in the loop, the compressor will boost the level of the hi-hats when they play on their own, but leave the level of everything else unaffected.
Downwards Expansion
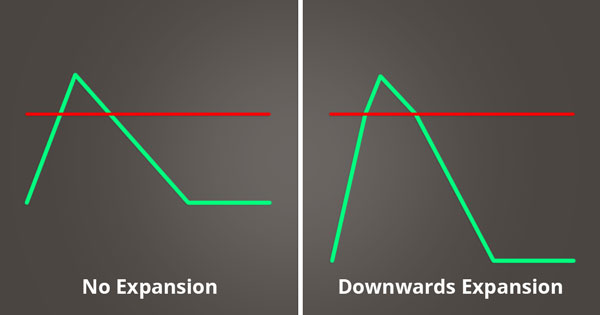
Downwards expansion reduces the volume of a signal when it reaches below a threshold; it increases dynamic range. An audio device called a gate performs downwards expansion and its useful in reducing the level of your noise floor. Suppose you’ve recorded guitar, but also recorded some string noise in the background. If the string noise is quiet enough in the recording, a gate can help reduce it’s level further, and even down to -inf. Using downwards expansion is a quick way of reducing stand-alone background noise in any recording. You can think of downwards expansion as the opposite of upwards compression.
Upwards Expansion

Upwards expansion boosts the volume of a signal when it reaches above a threshold; it increases dynamic range. Perhaps you have a snare sample that has been overly compressed. You can use upwards expansion to boost the level of the snare’s transient and provide it with more punch. You can think of upwards expansion as the opposite of downwards compression.
3. Basic Controls
Now that you know what a compressor does, you need to know how to control one. A compressor doesn’t just act on its own. There are certain parameters you need to set in order to make it behave the way you want. These controls are generally quite universal across all types of compressors, but I’ll be referring specifically to compressors that apply downwards compression (gain reduction) from here on out. Before you compress a signal you should ask yourself the following questions:
- What level needs to be reached before compression is applied? (Threshold)
- How heavily should compression be applied? (Ratio)
- How quickly will compression be applied when the signal reaches above the threshold? (Attack)
- How long will compression continue to be applied once the signal drops below the threshold? (Release)
Threshold

The threshold you set determines the level at which compression will be applied. Let’s say you set your threshold to -20dB. Any audio signal running through your compressor that peaks above -20dB will be compressed.
Ratio
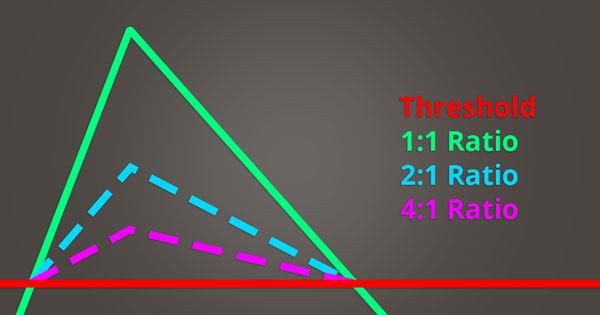
The ratio you set determines how heavily your audio signal will be attenuated. Typical ratios include 1:1 (no compression), 2:1 (light compression), 4:1 (moderate compression), and 10:1 (heavy compression).
DISCLAIMER: The following equations I’m about to show you won’t add up perfectly in the real world due to various factors, so I don’t recommend trying to calculate gain reduction using math formulas; they’ll be good for demonstrating what the ratio knob on a compressor does, so focus on the concept more than the actual numbers.
Here’s the formula to calculate how your ratio will affect the output level of the compressor without makeup gain:
- dB value that the signal peaks past the threshold / Ratio = X
- Threshold level + X = Level that the signal will be attenuated to
Let’s look at an example: You’ve set your threshold to -20dB. The audio signal you’re running through your compressor peaks at 0dB when the compressor is bypassed (or set to a ratio of 1:1). Here are the following values that will read out if you apply different ratios:
- 2:1 will result in a signal output level of -10dB. The signal reaches 20dB above the set threshold (-20dB) and is then reduced by a ratio of 2:1.
- 20db / 2 = 10 dB
- -20dB + 10dB = -10dB
- 4:1 will result in a signal output level of -15dB. The signal reaches 20dB above the set threshold (-20dB) and is then reduced by a ratio of 4:1.
- 20dB / 4 = 5 dB
- -20dB + 5dB = -15dB
- 10:1 will result in a signal output level of -18dB. The signal reaches 20dB above the set threshold (-20dB) and is then reduced by a ratio of 10:1.
- 20dB / 10 = 2 dB
- -20dB + 2dB = -18dB
Attack
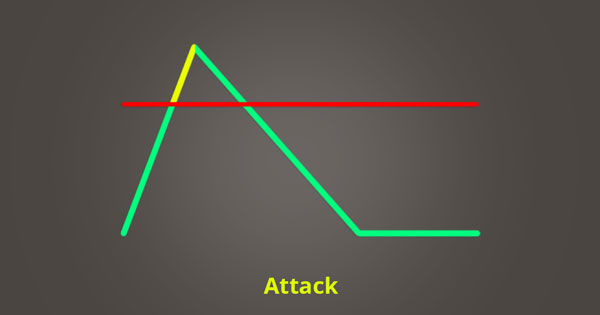
Attack determines how many milliseconds (ms) it takes your compressor to apply a full dose of compression to your audio signal once it passes the threshold. A short (fast) attack time will cause your compressor to quickly apply the full amount of compression once the signal reaches past the threshold, and is generally good for attenuating sharp transients.
A long (slow) attack time will cause your compressor to slowly apply the full amount of compression once the signal reaches past the threshold. If the signal peaks above the threshold and quickly returns to below the threshold, it may never receive a full dose of compression. Setting a longer attack time allows your compressor to ignore transients, and specifically target the tail end of sounds, leaving the transients unaffected. However, if you set your release too long, the compression you apply on the tail end of the first transient could end up compressing the peak of the second transient as well.
Release
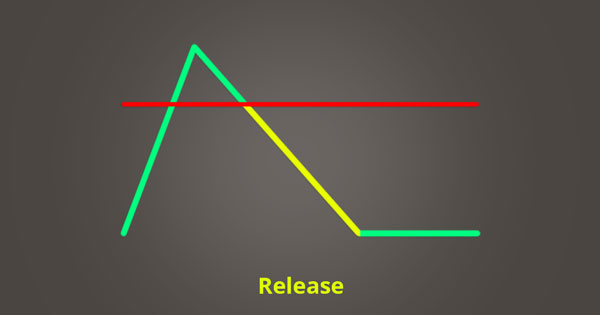
Release determines how many milliseconds (ms) it takes your compressor to stop attenuating gain once your audio signal drops below the threshold. A fast release will cause your compressor to stop attenuating gain quickly once the signal returns below the threshold. Using a fast release along with a fast attack is generally best suited for peak compression. A slow release will cause your compressor to stop attenuating gain slowly once the signal returns below the threshold. Using a slow release helps to keep the compression transparent, and is often best suited for long, sustained sounds like bass.
Makeup Gain
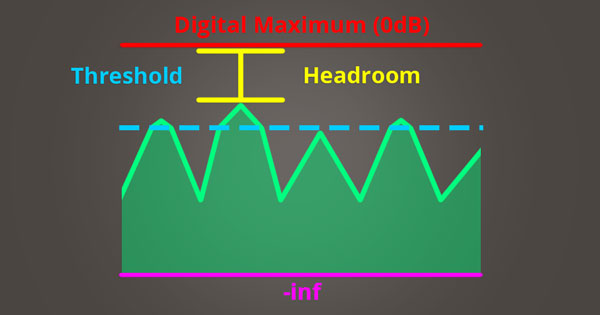
One of the nice side effects of applying compression is that it provides you with more headroom. Headroom is the number of dB between the peak of your audio signal, and 0dB (where digital clipping occurs). If your audio signal peaks at -20dB, you have 20dB of headroom to work with before clipping your audio.
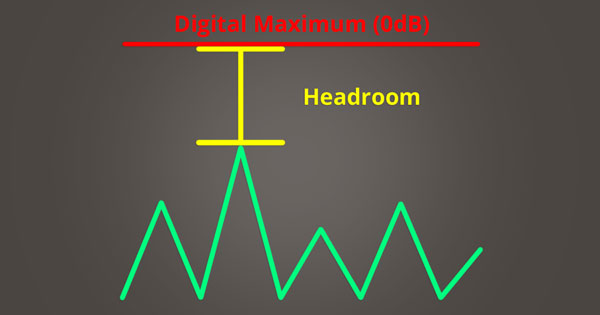
Many new producers are under the impression that downwards compression makes sounds loud. However, compression makes sounds quiet and increases headroom. The additional headroom provides you with space to turn up the overall level of your audio signal using the makeup gain knob; this is what makes quiet elements louder. In reality, compression isn’t what makes sounds loud, the makeup gain is what makes them loud.
If you match the peak output level of your audio signal pre and post-compressor, the compressed version will sound louder. What’s happening here? Why does the audio signal sound louder if it’s peaking at the same dB level pre and post-compressor? By compressing the peaks and bringing up the overall signal, you've increased the level of the noise floor; this means that the quiet elements that are apart of your audio file are now louder than they were before.

4. Advanced Controls
Compressors come in all shapes and sizes, some with more controls than others. The following controls are slightly less common, but mastering them will help tremendously when you're working in the studio.
Soft Knee vs. Hard Knee
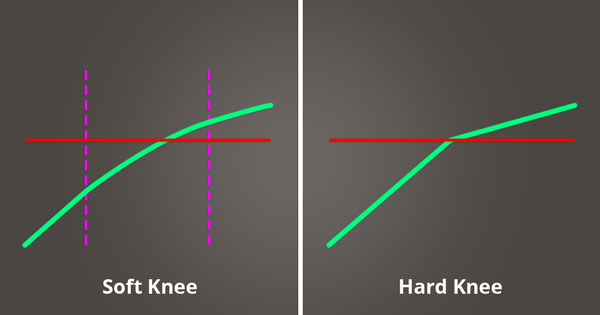
Some compressors have something known as a knee control; it allows you to set a dB range around the threshold in which the ratio you've set is gradually applied.
Let's say you set a knee with a value of 10dB (which is considered soft), and your ratio is set to 4:1. If your threshold is set to -20dB, your compressor will progressively respond to incoming signal within the range of -30dB to -10dB (reaching 10dB below the threshold and 10dB above the threshold). In the image above, this range is indicated by the dashed purple lines. As the audio signal increases throughout the range, the ratio increases. The full ratio is applied 10dB above the threshold at -10dB.


With a knee control setting of 0dB, you're applying a hard knee, which means that your range becomes a point. Nothing happens to the audio signal as it approaches the threshold, but as soon as it crosses the threshold, it's immediately attenuated based on the ratio you've set.
Most compressors respond with a knee that is softer than the hard knee indicated on the right in the image above. All of the hard angles in these diagrams are for demonstration purposes because it makes what's taking place blatantly obvious. In use, compressors aren't quite as perfect and responsive as I'm making them out to be; this also depends on the unit.
Peak Mode vs. RMS Mode
In peak mode, your compressor will respond to short peaks in your audio signal that reach above the threshold.
In RMS mode, your compressor will be less sensitive to short peaks and respond slower than if it were in peak mode. RMS (Root Mean Square) is a value commonly used in electrical engineering that helps calculate the power dissipated in AC circuits; this topic deviates slightly from compression, but I’ve included a great video if you’d like to learn more!
Auto Mode
It’s quite common to have an auto mode that will automatically set the release time on your compressor based on the signal being fed through it. I’ve also seen compressors that have the ability to automatically set attack times; although this is less common. Sometimes auto mode will strike a nice setting, but more often than not I prefer to set the attack and release times manually.
Lookahead
Changing your lookahead time changes the amount of time that your compressor will delay incoming audio signal. Increasing the lookahead time can drastically help if you find that the compressor you’re using isn’t responding well to its input. In the digital realm, CPU load plays a big factor in how your plugins perform. Giving your compressor an extra 10ms to process incoming audio can make a world of difference (in processing quality) when managing your CPU load.
Stereo Linking
Some compressors have the option to compress stereo channels linked, or unlinked. When linked the compressor will respond to the joint signal between stereo channels. When unlinked the compressor will respond to the independent signal of each stereo channel. I’d recommend you keep linking enabled for the most part because it’s possible to produce shifts in the stereo imaging if you reduce the gain in one channel, but not the other.
One of the benefits of unlinking the channels is that it can create a sense of openness or space which may be desirable. Just make sure to use the stereo linking feature in moderation and trust your ears to determine what sounds right for the material you’re working with.
5. Types of Compression
There are various different types of compression, each with the ability to provide a solution to a problem. I want to encourage you to refrain from applying compression just for the sake of applying compression; if a sound doesn't need it (and many sounds don't), then you don't have to apply it. In practice, I'm not using ratios of more than 2:1 or 4:1 very often. Sure, there are situations where I'll ramp up the compression, but for the most part applying compression in moderation is key.
Limiting

A limiter is a type of compressor that is capable of applying extremely heavy compression. Any compressor that applies compression with a ratio of 10:1 or higher is considered to be acting as a limiter. Limiters are typically set with short attack times, but this isn’t always the case.
“Brick wall limiting” is a term you’ve probably heard tossed around before. This is just an extreme form of limiting with ratios ranging from 20:1 all the way to inf:1. The point of applying brick wall limiting is to ensure that no audio signal exceeds the amplitude of the threshold. Brick wall limiting is especially useful when mastering because it can help you meet certain broadcast standards involving loudness.
Multi-Band Compression
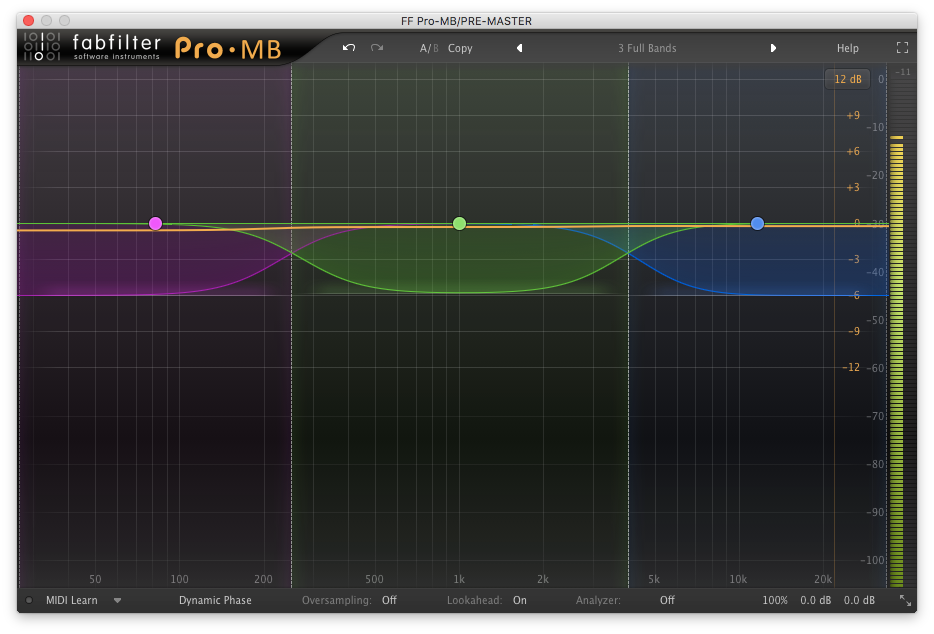
Multi-band processing allows you to affect different bands (frequency ranges) independent of one another. In regards to multi-band compression, you can compress your lows, mids, and highs with different compression settings. Multi-band compressors are common mastering tools because of the control over different frequency ranges they provide.
Example: You’re mastering a track for one of your peers and you want to apply some moderate compression to the mid range of the track. With a multi-band compressor, you enable a single band, set the range you want to affect, and then modify the band’s compression settings accordingly.
It’s good to note that you don’t need to use all of the bands on a multi-band compressor. Sometimes one or two bands are enough to get the job done. That being said, there is no hard and fast rule for how many bands you should use, so experiment!
OTT (Over The Top) is a preset for Ableton’s multi-band compressor. It’s one of those mysterious devices that everyone uses, but lots of people don’t understand. It’s quite simple and you already know about the concepts that make it work; it applies a significant amount of downwards compression and upwards compression; Steve Duda’s OTT performs the same processing as well.
Learn how to make a de-esser using a multi-band compressor and save yourself some cash... the ramen isn't going to buy itself.
Buss Compression
A buss is a point in your signal flow where multiple inputs merge into a single output. In Ableton, these are called groups, but in most other DAWs they’re called busses. It’s possible to apply plugins to your busses or run them through analog hardware. By applying compression to your buss, you are in fact applying buss compression. The goal of applying buss compression is to “glue” the individual elements of the buss together. Applying some gentle compression with a ratio of 2:1 is usually enough to get the elements of your buss to feel like they’re sitting together. By shortening the dynamic range of a buss, the elements within the buss are perceived as sharing the same space, even if your listener can’t quite place their finger on the reasoning behind this.
Sidechain Compression
When you enable sidechain mode on an audio device, you tell it to respond to an external input instead of the audio that’s running through it. Normally, the audio running through a compressor is what triggers it. When placed into sidechain mode, the audio running through the compressor will continue to pass through the device, but it will have no effect on how the compressor behaves. Instead, you select an external input (one of your other tracks) and the audio from that track is now what triggers the compressor. The original audio that was passing through the compressor will now be compressed according to the signal running into the compressor from the external source.
For example, people love to use sidechain compression when mixing their kick and bass together. It’s not always necessary, but it can often provide a desirable pumping effect. To do this, place your compressor onto your bass track, engage sidechain mode, and set the external output to the track that your kick is on. Your bass will now be attenuated every time your kick plays, freeing up some extra headroom.
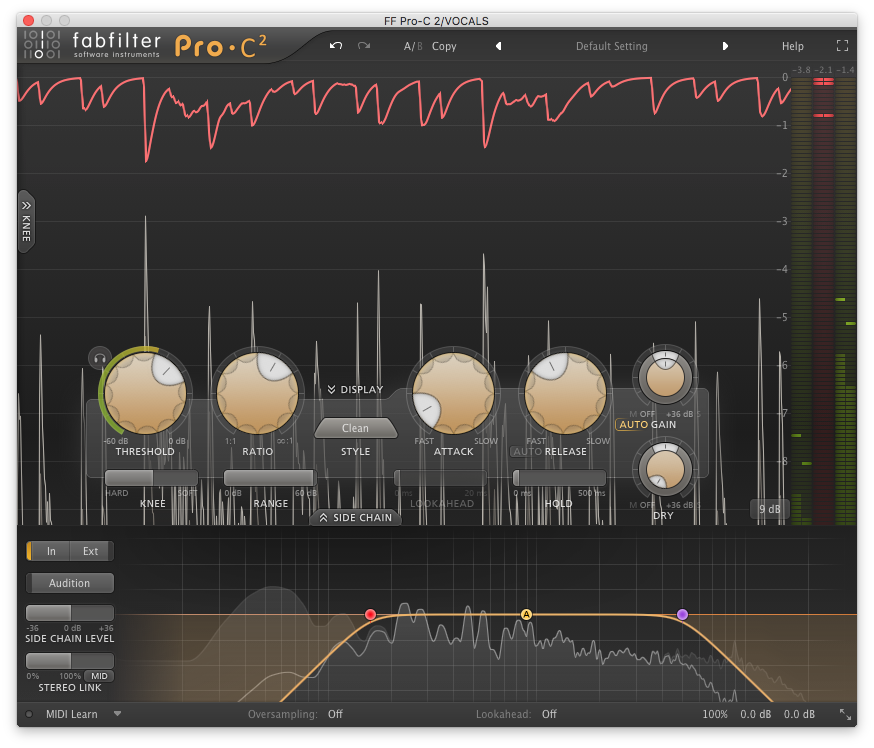
An interesting feature to note is the sidechain EQ that’s provided on some compressors (as seen in the above image of the Pro-C 2 by FabFilter). This EQ allows you to affect the frequency range that the compressor responds to using a highpass and lowpass filter. You can set this up to act upon internal signal or external signal depending on your needs.
Internally, the sidechain EQ will tell the compressor to only respond to signal passing through it within the specified frequency range; this doesn’t mean that it will highpass and lowpass the output signal, it simply means the compressor won’t respond to frequencies outside of this range. The same thing goes for external inputs that are being used as a sidechain signal.
Serial Compression
Serial compression is when you use multiple compressors in a row, one after another. You’ll get a more natural sound by applying light compression with multiple compressors than you will by applying heavy compression with one compressor.
You may have seen people use multiple limiters on their master chain. It seems like one limiter should be enough though, right? I was extremely skeptical about trying this out myself, but through multiple A/B comparisons, I found that I was getting better results using multiple limiters in serial than just one limiter on its own; they didn’t even have to be different limiters. I’ve used 2-3 Pro-L 2s in a row, each performing mild limiting, and the final result was heavy limiting that sounded more natural than one limiter acting on its own.
Parallel Compression
Parallel processing is when you duplicate an audio track and apply processing to the duplicate; parallel compression is when you apply heavy compression to the duplicate. People will usually use a higher compression ratio for parallel compression ranging from 4:1 to 10:1. By mixing the level of the duplicate track back in with the original, it’s easy to strike a balance between a dynamic and a compressed signal.
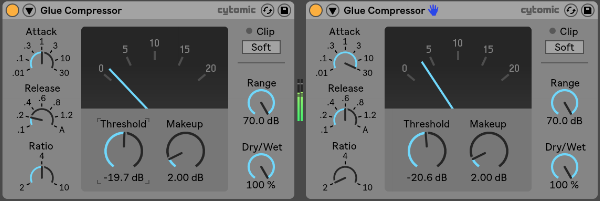
I recommend applying parallel compression on an aux (return) track because you can further process the compressed signal this way. However, this isn't always necessary and you can apply parallel compression by adjusting the dry/wet knob on your compressor (as I'm doing with the compressor in the image above using the Dry Mix knob).
Another result of parallel compression is that it raises the level of the noise floor which can sometimes be quite desirable. It will make the track you’ve applied parallel compression to appear louder, without actually making it that much louder.
If you’d like to learn more about parallel processing and parallel compression you can read my guide on How to Use Parallel Processing to Simplify Mixing.
6. Compression Techniques
I want to start this section off by making it very clear that compression isn’t always required on every element in your mix; this goes for banging EDM mixes as well. It’s important to distinguish between when you NEED to apply compression (which is often the case for raw recordings), and when you WANT to apply compression (which is often the case for samples downloaded off of Splice).
If you’re new to the concept of compression, chances are you’re going to ruin a lot of mixes with it before you start to improve mixes with it; and guess what… that’s OK! You won’t learn how far you can push your compressor until you go too far. To truly understand what your compressor is doing, I encourage you to use extreme settings when you’re experimenting with it (specifically an extreme threshold); this will allow you to really hear what it’s doing, and from there you can dial these settings back.
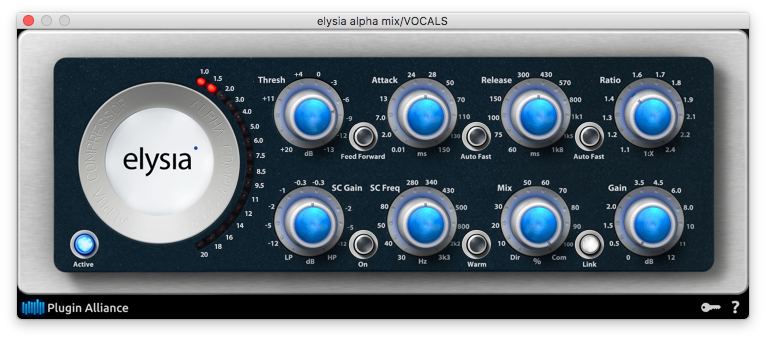
Compression on Vocals
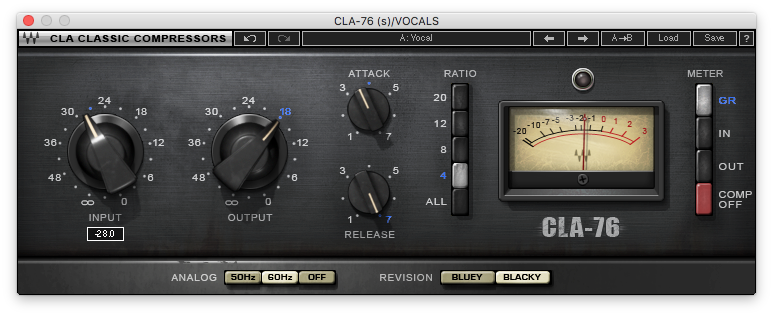
1176 compressor emulations like the CLA-76, along with SSL style compressors like the Waves SSL G-Master Buss Compressor are both popular choices when compressing vocals. They allow for fast attack and release times, capable of controlling unruly transients. In the following video, I demonstrate how to compress vocals properly, step-by-step.
Compression on Drums

For the sake of my audience (a majority of which are bedroom producers), I’m going to assume that you aren’t recording your own drums. This means that most of your samples are coming straight off of Splice. Not too many of the samples you use are going to require compression because a lot of the samples off Splice are already compressed. The main type of compression you’re going to benefit from on your drums is buss compression.


