


A lot of people have trouble getting their kick and bass to sit together just right. I'm going to show you how to achieve a clean low-end using sample selection, EQ, dynamic EQ, sidechain compression, multi-band sidechain compression, and sidechain volume automation. There's also a special trick for layering kicks and 808s together.
I recommend bookmarking this page so you can reference it later. Some of these techniques are simple, while others require a bit of setup. You may need to run through some of these methods a couple times before remembering how to apply them properly. The topics being covered include the following:
- Sample Selection
- EQ
- Dynamic EQ
- Sidechain Compression
- Multi-Band Sidechain Compression
- Sidechain Volume Automation (Volume Shaper)
- Layering Kicks With 808s
1. Sample Selection
The easiest way to achieve a balance between your kick and sub is by choosing elements that work together. People obsess over “mixing,” and adding tons of processing.
The fastest and easiest way to mix is by picking samples that mix themselves. If your kick and sub have a ton of frequency content in exactly the same little frequency range, it’s going to be a nightmare fitting them together. I probably have 500+ kicks I can choose from and I’m sure you do too. Scroll through your kicks folder, find a kick that compliments your sub, and be done with it.
If you’re doing mixing work for clients, sample selection is sometimes off the table. “Nah bro, it’s gotta be that kick. That’s the one, I’m telling you. It’s the perfect kick.” If you’ve done collabs with people, you’ve probably experienced this before as well. Luckily the rest of this list addresses what to do if you don’t have control over sample selection, want to massage your kick and sub together a little more, need to force two completely opposing sounds together or want that pumping effect that’s a result of heavy sidechain compression/volume automation.
2. EQ
I only recommend using a standard EQ if your kick and bass are sitting together well, but just need a little cleanup. The goal here is to cut frequency from your bass, allowing more room for your kick. Alternatively, you could cut frequency from your kick, and leave more room for your bass. Cutting more than a couple dB could destroy the integrity of either sound, so use a different method if this doesn’t work.
Neutron by iZotope has a masking feature that’s perfect for finding frequency buildups. It allows me to quickly locate frequencies that have built up as a result of my kick and bass stacking together, allowing me to attenuate them. To set this up properly:
1. Place an instance of Neutron on your kick channel and another on your bass channel.
2. On your kick channel, click on the “masking” feature within Neutron.
3. From the drop-down menu, select the instance of Neutron that’s on your bass.
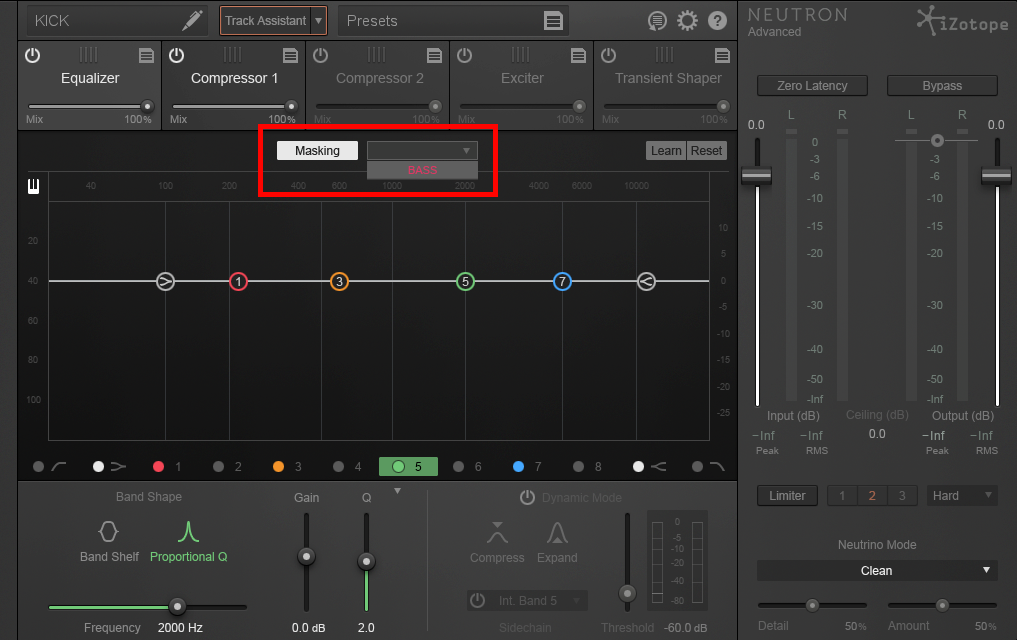
4. The graph shows you where frequency buildup is occurring as a result of your kick and bass playing at the same time.

5. By adjusting the EQ, you can attenuate problematic frequencies on either your kick or your bass. Click on the "!" to reset conflicting frequency meter data.
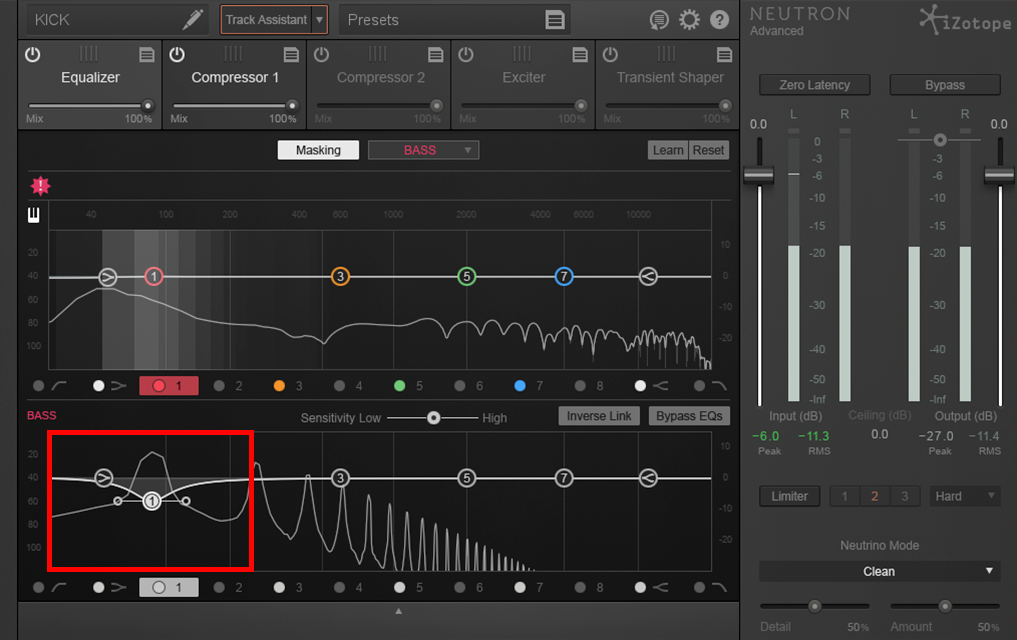
6. Engaging “Inverse” will link the bands between each instance of Neutron and cause one to boost while the other cuts.

3. Dynamic EQ
The issue with a standard EQ is that it’s static, meaning that it doesn’t respond intuitively to the frequencies running through it. What if you want to cut 3dB from your sub at 88Hz, but only when it reaches above a certain level? The solution is to use a dynamic EQ.
A Dynamic EQ reduces signal that reaches above a set threshold. They can also act in the opposite way and boost the signal that reaches above a certain threshold. Dynamic EQs provide you with a more lively type of gain control than a standard EQ. This method is excellent for reducing harsh kick peaks that may be stacking too heavily with your bass.
1. Place a dynamic EQ on your kick. In this case, I’m using iZotope Ozone’s Dynamic EQ. Open up the plugin and select the band you’d like to affect.
2. Pull the band down a couple dB to see the frequency range you’ll be affecting. Dial in the Q (bandwidth), gain and frequency.
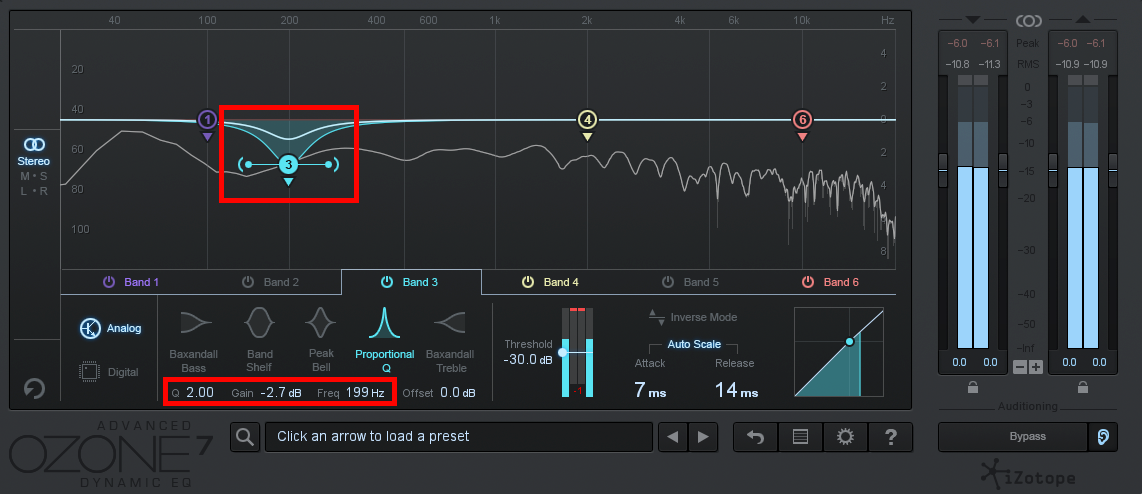
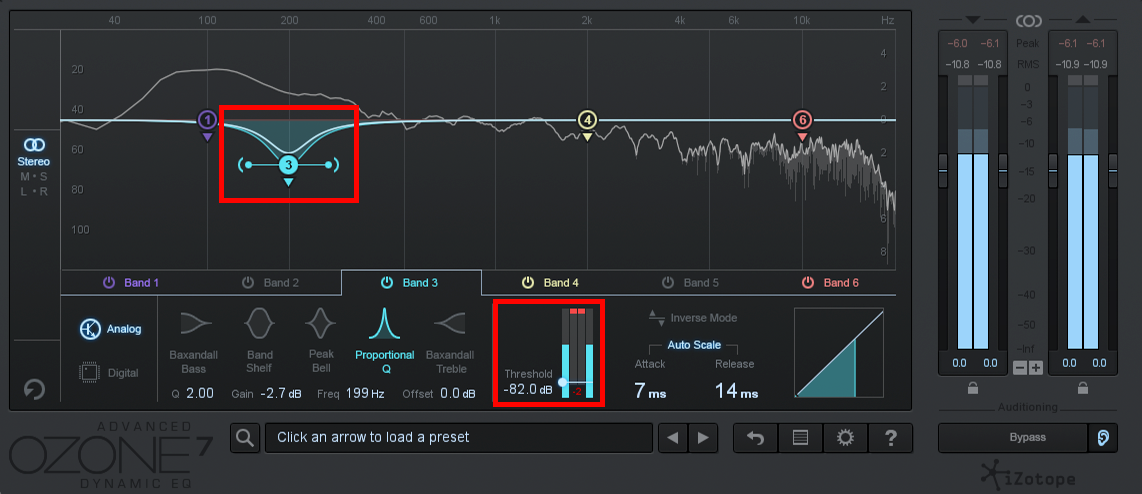
3. Reducing the threshold level of the band will result in more gain reduction.
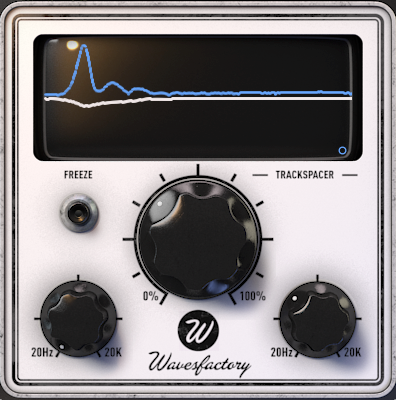
There's one more dynamic EQ that I recommend and it's called TrackSpacer. This little guy has 32 bands! These bands are all set in place and all you need to control is the low and high cutoff frequency of the sidechain signal. The large middle knob controls reduction ratio, resulting in light to heavy gain reduction. The great thing about this plug-in is that it's visual. You'll see what each knob does as soon as you start messing around with it.


There are some advanced settings that can be displayed by clicking on the little blue circle. These include Pan, L/R, M/S, Attack, Release and Sidechain (which auditions your sidechain signal). TrackSpacer has quickly become one of my favorite mixing tools due to its simplicity and rewarding sound.
4. Sidechain Compression
Sidechain compression allows you to compress your bass when your kick plays. It forces the bass down, allowing more room for your kick. As soon as the kick has finished playing back, the bass returns to its normal level. You’re essentially using your kick to trigger compression on your bass. I’m going to show you how to set this up in Ableton. Routing audio is a little different in every DAW, but the concept is exactly the same.
1. Place a Glue Compressor on your bass.

2. Click the Sidechain Toggle button to display the sidechaining options. It's the little triangle button in the top left corner.

3. Enable the “Sidechain” button.
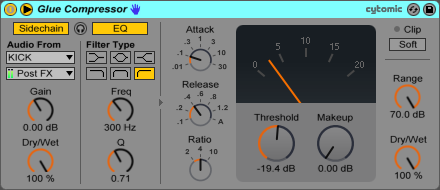
4. Enable the “EQ” button, select the highpass filter type and set the frequency to 300Hz. This will cause the compressor to only react to the “click” of the kick. The result will be a punchier for of sidechain compression.
5. Bring your attack and release times all the way down.
6. Reduce your ratio to 4:1 for moderate sidechain compression or 10:1 for aggressive sidechain compression.
7. Reduce your threshold until you see the compression meter doing around 5dB of gain reduction. If you've set everything properly, your compressor should look like the following image and be hitting 5dB of gain reduction each time a kick plays. This will duck the sub out of the way each time the kick hits.

8. Adjust your release time until you feel your kick smoothly transitioning into your bass.
9. Dial in the amount of compression being applied using the threshold knob.
5. Multi-Band Sidechain Compression
Let’s say you only want to compress the low end of your bass when your kick plays. This is possible with the use of multi-band sidechain compression. A multi-band compressor splits up the entire frequency range into smaller bands (ranges) and allows you to compress each band separately. The cool thing about this is that you can compress each band with different compression settings.
Fabfilter’s Pro-MB is one of the most versatile multi-band compressors I’ve used and it’s the one I’d recommend for this particular application. The Pro-MB allows you to route audio to it, from an external source, and use that audio to trigger compression on each band. This means you can use your kick to trigger compression on just the low end of your bass.
1. Place Fabfilter’s Pro-MB on your bass track.
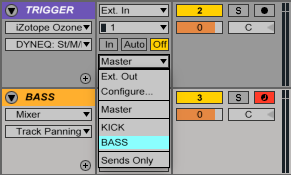
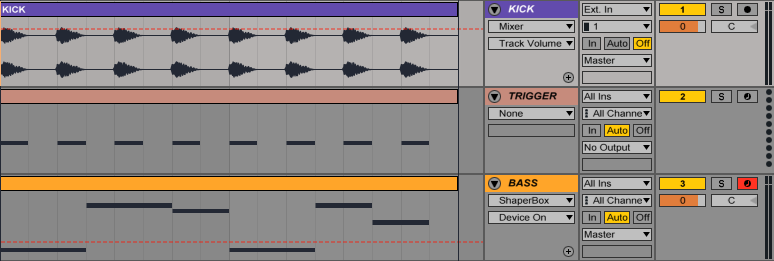
2. Duplicate your kick track and rename the duplicate “Trigger."

3. Change the output routing of your Trigger track from “Master” to “Bass.” You may have your bass track labeled as something else, so just select whichever track your bass is on.
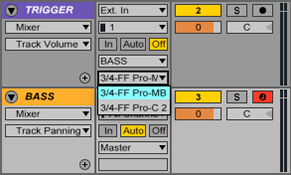
4. On your trigger track, click the drop-down menu below the one you selected in step 3. Select "3/4-FF Pro-MB." This is going to route audio from your trigger track, directly to the sidechain input of the Pro-MB. Doing this gives the Pro-MB an external source to respond to. (Note: This drop-down menu will be greyed out if there are no other devices to send audio to on your bass track. Skip this step if the drop-down menu is greyed out.)
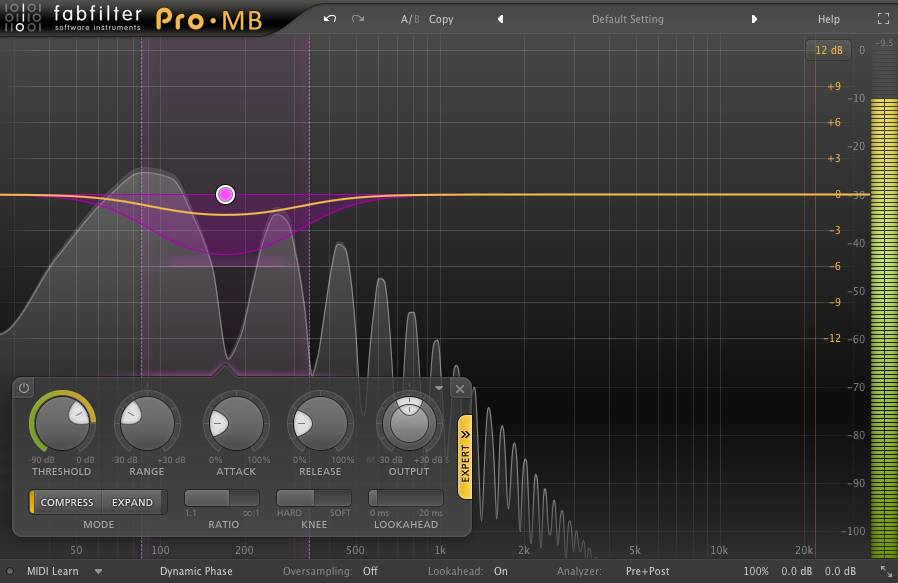
5. Open the Pro-MB on your bass track and click on the yellow line to insert a band.
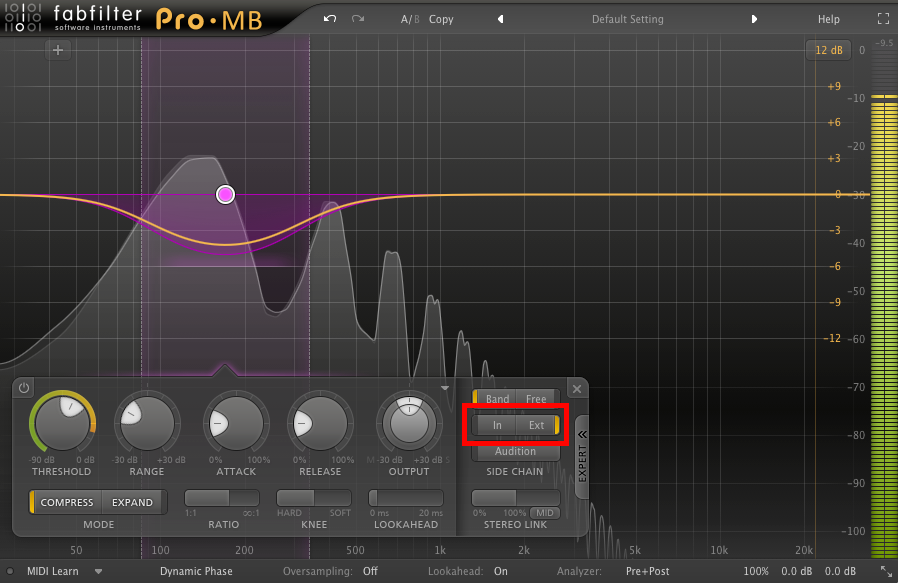
6. To set up the sidechain feature, click on the “Expert” tab.
7. In the expert menu, toggle on “Ext.” This will cause the band to react to the external signal being routed into the Pro-MB. In this case, the Pro-MB on the bass track will now react to the input signal coming from the kick track.
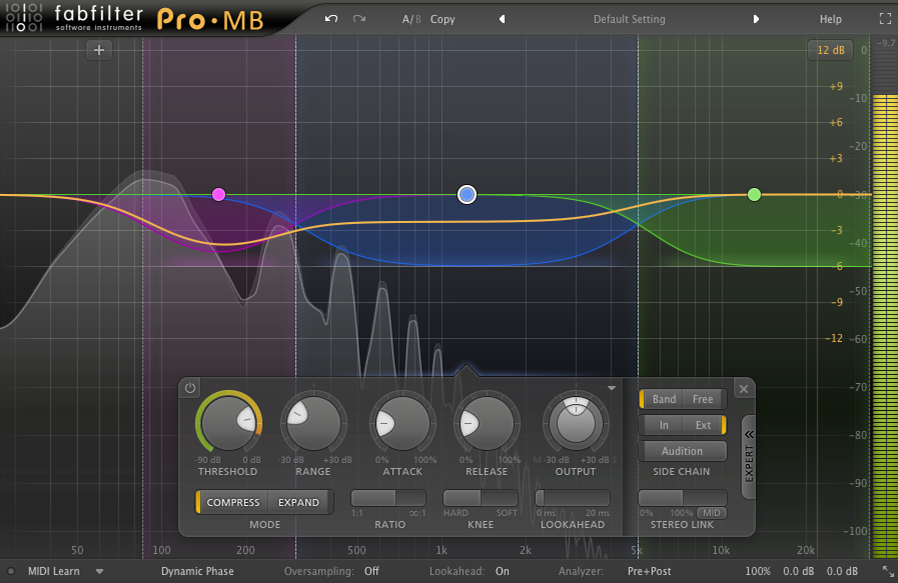
8. Adjust the low and high crossover points to set the band’s width. The frequency range that you select will be the area affected by compression.
9. If you want to insert another band, click on the yellow line again. You can choose different compression or expansion settings for each band.
In the following video, I demonstrate how to apply sidechain compression using FabFilter's Pro-C 2 (broadband) and Pro-MB (multi-band).
6. Sidechain Volume Automation (VolumeShaper)
You may be familiar with the volume automation tool called LFO Tool, but I’m suggesting you use Volume Shaper instead. LFO Tool is great and has a ton of awesome features, but for super aggressive sidechain volume automation, Volume Shaper outperforms it. You can push Volume Shaper really hard and set incredibly steep slopes. Artifacts will begin appearing in LFO tool far sooner than in Volume Shaper.
1. Place Volume Shaper on your bass track.
2. Create a MIDI track and draw in a C1 note where each kick is hitting. If you don’t use a C1 note, the MIDI won’t trigger Volume Shaper. You also need to make sure that there are no audio devices on your MIDI track. If there are, they'll convert the MIDI signal into audio, which isn't what you want.
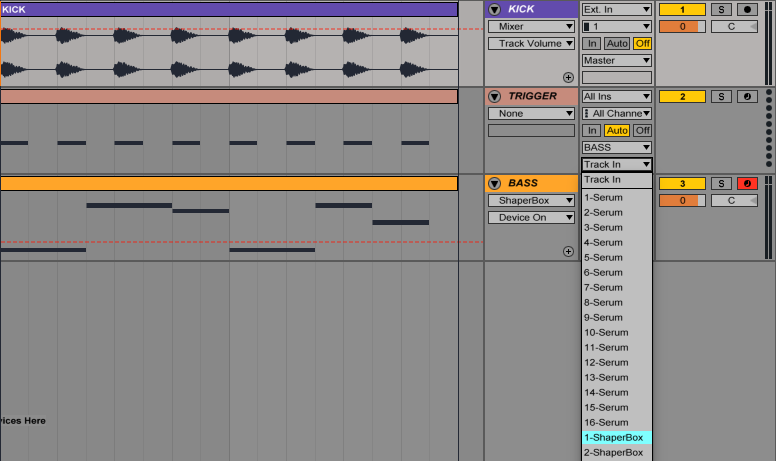
3. Change the output routing of your Trigger track from “No Output” to “Bass.” You may have your bass track labeled as something else, so just select whichever track your bass is on.
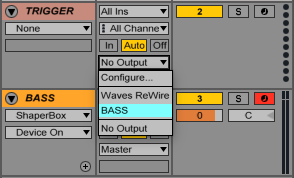
4. On your trigger track, click the drop-down menu below the one you selected in step 3. Select "1-ShaperBox." This is going to route audio from your trigger track, directly to the MIDI input of Volume Shaper. Doing this gives Volume Shaper an external source to respond to.
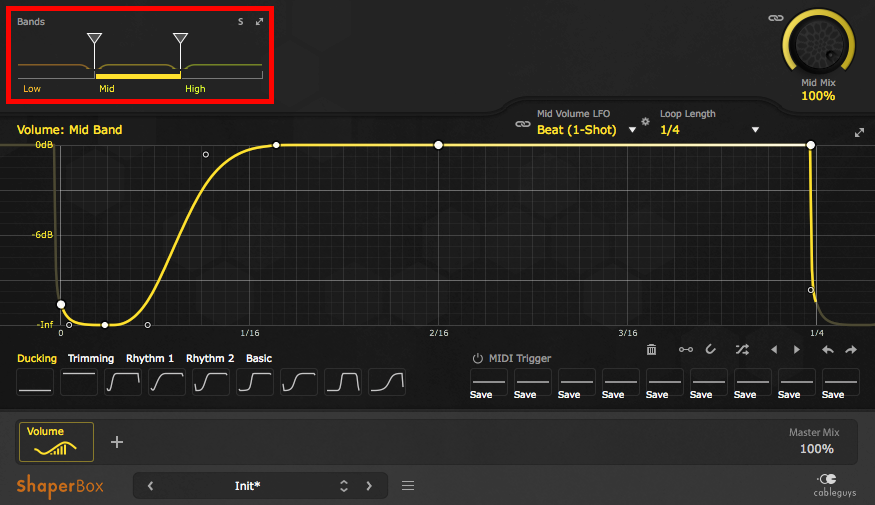
5. Select one of the ducking presets to get started.
6. Click on the drop-down menu where it says Beat (Synced) and select Beat (1-shot). This will cause the external MIDI input (from your trigger track) to trigger Volume Shaper each time a MIDI note plays.
.png)
7. Adjust the slope settings until you achieve a pulsing effect that appeals to you. If you’ve set it up correctly, Volume Shaper will reduce the gain of the bass each time your kick hits.
8. Adjusting the loop length speed up or slow down the speed at which Volume Shaper is affecting the bass.

9. Play around with the settings until you get a sound that works for your track. Volume Shaper will allow you to duck your bass a lot harder than a compressor will. If you’re hearing artifacts, adjust the LFO slopes until they disappear.
10. A nice extra feature is that you can put Volume Shaper in multi-band mode by adjusting the crossover points in the top left corner. Each band can have it's own settings, allowing you to automate the volume of each band independently from the others.
7. Layering Kicks with 808s
If you have a kick that you’re trying to layer with an 808 sample, there’s a super easy way to do it: increase the attack time of your 808. Somewhere around 30ms should do. By increasing the attack time of your 808, you’re allowing the kick to play first, and as the kick decays, the 808 comes in to take its place. This will only work well if your kick has a short decay time. If not, the kick’s tail will conflict with the 808 as it comes in. By layering a kick and bass in this way, you’re using the kick for its “click” and the 808 for its weight.
You can save a lot of time by working with pre-processed 808 samples. Putting aside time to work on sound design can be fun, but when you're working on a track and you're trying to get ideas down quickly, you need high-quality audio samples at your fingertips. Black Ghost Audio has a huge 808 pack called 808 Destruction that's free to download. It contains 50 aggressive royalty-free 808 audio samples that are perfect for writing EDM, hip-hop, pop, and more.
The techniques that I've demonstrated here aren't meant exclusively for kicks and basses. If you have a vocal or a lead synth that's struggling to be heard, consider trying out some of these methods in order to provide them with more space.


