
What exactly is a wide mix, and what are the advantages/disadvantages of one? It seems like creating a wide mix is a good thing, but is it? I’ll be discussing these questions in more detail and providing you with six different tips for successfully creating wide stereo mixes that thunder out of both stereo and mono playback systems.
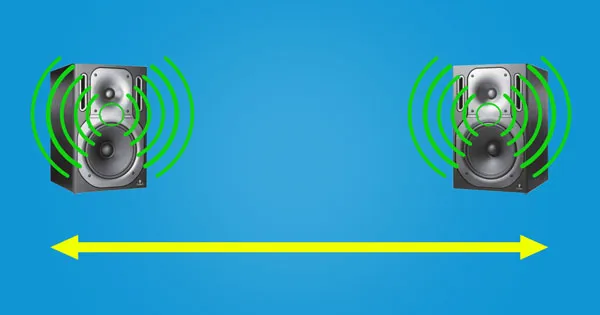
A single studio monitor speaker is capable of producing a mono signal. It can reproduce frequency (Y) and depth (Z) without much difficulty. When you introduce a second studio monitor, the pair of speakers are capable of producing a third dimension, width (X). The three dimensional space that’s created in front of you, and between your studio monitors, is known as a stereo field.
Manipulating a song element’s frequency content will move it along the Y-axis, and modifying the element’s volume, spatial effects like reverb, and even compression will move it along the Z-axis. To move sounds along the X-axis, you need to create either volume or timing differences between the left and right channels of your mix.
The following video visually demonstrates the concept of a stereo field, and uses images from David Gibson’s book called The Art of Mixing.
To hear information on the X, Y, and Z-axis, of your stereo field, you need to make sure that your studio monitors are set up properly. You’ll need to grab a measuring tape and create an equidistant triangle with a point directly behind your head, and your two speakers. It’s also quite important that you measure from the acoustical axis of your speakers. Vespers has a great tutorial on how to effectively position your studio monitors, and quickly improve the monitoring situation in your home studio.
Before continuing with this article further, I recommend checking out “How to Create Punchier Songs Using Phase Alignment” to ensure that you understand the concept of phase, the pitfalls of phase correlation issues, and how to correct phase issues within your mixes. I refer to “phase issues” a number of times throughout this article, so it’s worth brushing up on the topic.
1. Make Use of Panning
Modifying a track’s pan position adjusts the track’s position in the stereo field along the X-axis. Knowing this, you can position mono recordings along the X-axis with pinpoint accuracy, and create wide mixes by spacing apart track elements. Generally, I like to pan elements to 50L, 25L, 0, 25R, and 50R. If I run out of room and need to pan elements between these values, it’s usually an indication that my mix is too busy and that I have an arrangement issue that I need to deal with.
You should be careful about spacing out track elements in a way that makes your mix feel heavy to one side. If you have a closed hi-hat panned 25L, consider panning something like a cymbal 25R to even out the balance of your top-end. When balancing a mix, I like to imagine that I’m trying to sculpt my mix into the form of a tree; narrow at the bottom and branching out up top. Doing this allows me to benefit from the width that panning provides, while ensuring that when the song is collapsed to mono it maintains its integrity. You can generally spread your top end more than your bottom end before running into significant phase issues.
Perhaps you’re working with a sparse arrangement and don’t necessarily have enough track elements to provide a counterpart to every element that you’ve panned. You can use spatial processing like a reverb on an aux track to deal with this. Don’t be afraid to treat your aux tracks like any other track; you can pan them, EQ them, and compress them. Let’s say you’ve panned a clap 25L; try sending some of its signal to an aux track with a reverb applied and pan the aux track 25R to balance out the mix. For even more control, put the aux track into mono before you pan it.
If you're really struggling to fit an element into your song, audition the entire song in mono and pan the troublesome track element in this state. Adjust its pan position until it sounds clear and present, then leave it where it is; doing this ensures mono compatibility. Check your mix in stereo and if it sounds good, you're in the clear.
2. Use Stereo Imaging Plugins
iZotope’s Ozone Imager is a free stereo imaging plugin that provides a polar sample, polar level, and lissajous vectorscope. It also offer a phase correlation meter, and simple controls that include a Width slider, and Stereoize slider. If you choose to upgrade to the full version of Ozone, you’re able to apply multi-band stereo imaging, which is extremely useful for mastering purposes.
Ozone Imager allows you to add width to narrow or mono mixes. The Width control affects the amount of stereo widening applied by the plugin, and according to the help documentation provided by Ozone, it states that “By adjusting the amount control in conjunction with the width slider, you can control the character of the stereo effect. The Stereoize effect is completely mono compatible; even if you add width to audio, it can still be played back in mono without producing unpleasant artifacts. The Stereoize effect can be used to add natural-sounding stereo width to mono or narrow sounding recordings.”
Some other viable stereo imaging plugins include the Brainworx bx_stereomaker and Waves’ Center. The Brainworx bx_stereomaker is a relatively simple device that creates stereo signals from mono recordings. I quite like using it on individual tracks to provide them with some subtle stereo width. It even offers a Mono knob that allows you to mono your bass frequencies up to the crossover frequency that you select.
Waves’ Center allows you to separate phantom center content from side (L/R) content and process them independent of one another. If you don’t have access to a mix, this plugin can be a real life saver because of the way that it lets you get quite technical the level of your mids and sides, and do things like change lead vocal levels during mastering, accentuate/tame overheads in a drum buss, and add punch to the kick and snare in an already mixed track.


3. Double Track Instruments and Vocals
Double tracking is a recording technique in which a performer sings or plays along with their own prerecorded performance. When you pan the original recording and new recording hard left and right, you benefit from a wide stereo image. The more variation in pitch and time there is between the two performances, the wider the resulting stereo image will sound.
Genres like Folk tend to benefit from loose doubles because imperfections like this help enhance the organic nature of the material. On the opposite end of the spectrum, genres like Pop tend to benefit from tightly arranged doubles. As you add more doubles and harmonies to an arrangement, it becomes increasingly important that you make an effort to remove noise like excess mouth sounds and aggressive breathes. I typically keep the breathes of my lead vocal intact and drastically reduce, or even remove, the breathes of my doubles.
It takes a very skilled singer or instrumentalist to be able to nail the same performance twice. Luckily, automatic dialog replacement (ADR) software like Synchro Arts’ Revoice Pro allows you to pitch and time align audio files with one another. This type of software tends to work best with recordings that are already closely pitch and time aligned. If you currently use warp markers to time align audio files, ADR software is a big time saver.
4. Create Synthetic Doubles
You can simulate the effects of double tracking by duplicating an audio signal, panning the original hard left, the duplicate hard right, and then applying some form of pitch and/or time modulation to the duplicate. Creating synthetic doubles in this way doesn’t usually result in the same broad width as double tracking, but it’s a good option if you work primarily with samples. Even if you are capable of recording doubles, synthetic doubles provide an extremely tight sound that you may find desirable.
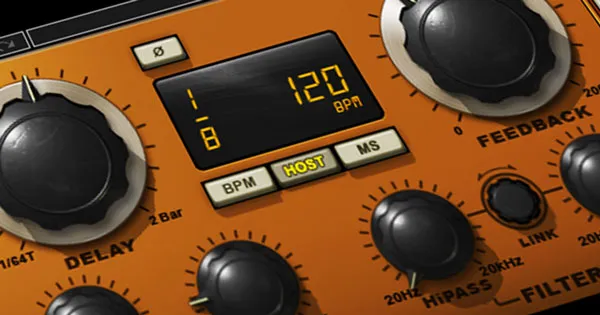
If you have a lead vocal and want to create doubles that can be panned left and right for added width, there are a couple tricks you can use to make ensure that the product turns out well. Start by creating two duplicates of the original vocal, pan them hard left and right, and then bring their level down slightly; this will ensure they don’t overpower the main vocal. Introduce a track delay of around 10 ms to the vocal panned left, and a track delay of around 20 ms to the vocal panned right; this should add just enough variation that you’re able to distinguish the vocals from one another.
To create even more sonic variation, you can apply apply chorus effects to the doubles to modulate their pitch and time, heavily compress or saturate the doubles, apply high-pass or low-pass filters, and even process the doubles with their own reverb and/or delay. The more you do to separate the doubles from the lead vocal, the more apparent it will be to the listener that the doubles are independent of the lead vocal. Additionally, the more variation you introduce between the doubles, the wider they will appear in the stereo field.
5. Push Elements Beyond The Edges of Your Speakers
By making use of phase inversion, you can make track elements appear as though they’re coming from beyond the edges of your speakers. Pulling this off successfully requires you to make a complete U-turn and knowingly mix two signals so that complete phase cancelation occurs.
To use this technique, duplicate a mono signal, pan the original signal hard left, and the duplicate hard right. At this point, it should sound like you just have a slightly louder mono signal. Invert the phase of the duplicate and you’ll instantly hear the two signals tear apart from one another, seemingly pushing themselves beyond the outside edges of your monitors. If you use Ableton, you can simply apply a utility with one of the Left/Right Phase buttons pressed to a dual mono track to achieve the same results.
While this initially seems like the ultimate stereo width solution, you need to keep in mind what will happen when these two signals are summed to mono; they’ll result in silence due to complete phase cancellation. This may seem like a catastrophe, but if you account for the fact that the signal will disappear in mono, you’re in the clear.
Mono compatibility doesn’t mean that everything that’s audible in the stereo version of a song is also audible on mono playback systems. It simply means that the mono version of a song is still capable of representing your artistic vision. You can almost think of this as two versions of a song packed into a single audio file.
If you know that the guitars you’ve panned left and right are going to completely disappear in mono, tuck a third guitar playing the same part in mono behind your lead vocal so that there’s still guitar present in your mono mix.
6. Don’t Rely Too Heavily on Meters
Relying solely on vectorscopes and phase correlation meters to determine how far you can push the stereo information in your song doesn’t make much sense; meters don’t have ears! It’s not necessarily a bad thing if a phase correlation meter is indicating phase incoherency. As long as you know why this is occurring, have accommodated for the the discrepancy, and you’re happy with how the song sound in both stereo and mono, everything is fine.
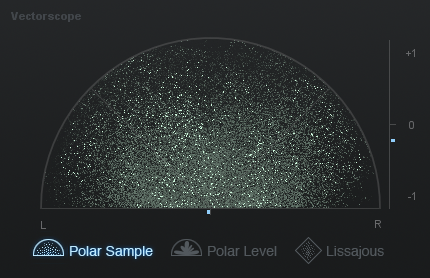
Deadmau5’ most recent track called "Drama Free (feat. Lights)" exhibits extreme phase correlation issues on multiple different meters. It sounds as though he took the track and ran it through a device like iZotope’s Stereo Imager with all bands set to 100%. I don’t personally love how this sounds because I think it takes away from the potential impact of the song, but even absurd mastering techniques like this are a viable option for attaining stereo width.
The following image is of Deadmau5' song "Drama Free (feat. Lights)" run through iZotope's Polar Sample Vectorscope and Phase Correlation Meter; these meters are indicating poor phase correlation. While many mixing engineers may typically consider this "bad," there's no rule stating that you can't use extreme stereo imaging techniques if you enjoy the results.