


Return tracks are an essential part of every producer and engineer's workflow. They allow you to apply universal processing to your tracks, provide a sense of congruent space and save a ton of CPU. If you want to learn how to setup return tracks, check out this awesome guide. Ableton provides users with a maximum of 12 return tracks. Unfortunately, some projects require more than that. A single vocal may be using up 4 return tracks alone (dedicated reverb, delay, saturation, etc.). Ableton allows you to work around this issue with the use of audio effect racks.
Audio effect racks allow you to create device chains. A single audio effect rack can contain multiple device chains, which is perfect if you want to apply parallel processing, map controls from multiple chains to a single knob, or quickly switch between audio effect chains during a live performance.
To create an empty audio effect rack navigate to Categories > Audio Effects > Audio Effect Rack. This can be found in the left-hand browser section of Ableton. To add the audio effect rack to the device view of your track, either double click on it, or drag and drop it onto the track you'd like to apply it to.
To create an audio effect rack from existing devices, right click on the title of the first audio effect that you want apart of your chain. Hold down "Shift" and then click on the last audio effect that you'd like to be apart of your chain. With the audio effects highlighted, use the key command "CMD+G" to group the audio effects into an audio effect rack. If there's a virtual instrument apart of the devices you've selected, it will group them into an instrument effect rack. Instrument effect racks are very similar to audio effect racks and most of the following concepts apply to both.
Audio Effect Rack Sections
Audio effect racks contain multiple sections that can be toggled. These include the Device View, Chain List, Macro Control Panel, and Chain Select Editor.
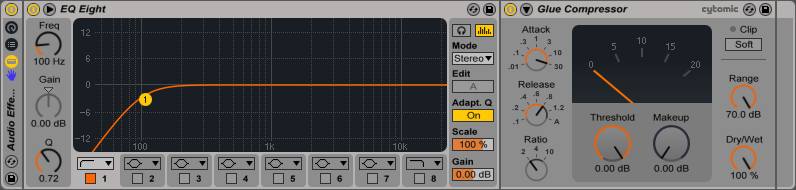
The first section is called Device View. This section holds different devices within the chain. I've added the EQ Eight and Compressor, but you could choose any audio effects you like. If you want to add more audio effects, simply drag them onto the end of the device chain you've already made. If you want to re-order them, just click the header of the device you'd like to move and drag it to where you'd like it to sit amongst the other devices.
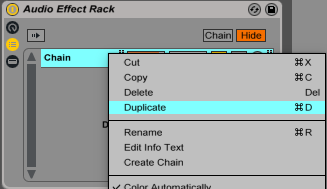
The next section is the Chain List. This section splits the incoming signal into different paths and processes them separately. To create a new chain, right click below the existing chain and select “Create Chain.”

If you want to duplicate a chain, left click on it and then use the key command “CMD+D” or right click on it and select “Duplicate.”
These chains can be renamed by left clicking on them and then and using the key command “CMD+R” or right clicking on them and selecting “Rename.” The two bars to the right of the chain’s name show a visual representation of the chain's input level. To the right of this is the volume output level of the chain which can be dragged up and down to change it’s value. Alternatively, you can type a numerical value into the box.
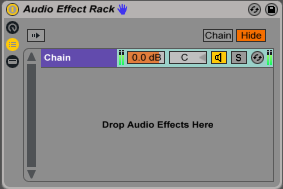
To the right of this is the chain pan position, which controls the left/right stereo placement of the chain’s output. Moving along we have the chain activator. When deactivated, this button will mute the track. When selected, the button with the “S” will solo the chain. You can solo multiple chains at once by holding down “CMD” and clicking on the “S” of another chain. The button to the right of this is a hot swap button, allowing you to cycle different saved audio effects.
Create Unlimited Return Tracks
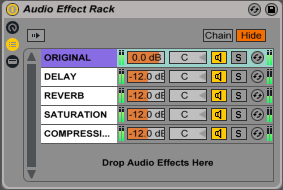
If you have 5 chains full of processing, but leave the first chain free of processing, you've created 4 return tracks. The first chain is your original, dry signal. Each additional chain can be used as a return track for parallel processing. You can add up to well over 100 chains in a single audio effect rack, which means you're pretty much never going to run out of returns.
If you have a global return track dedicated to parallel processing a single channel, you're better off applying the parallel processing as part of an instrument or audio effect rack. This will free up a global return track that other channels can now use.
If you need to create more global return tracks, it's possible, but slightly more work. Create a new audio track by using the key command "CMD+T". Label it something like "Parallel Compression". You need to duplicate the tracks that you want to send to this new return and then change their output to "Parallel Compression". The sends in Ableton automate this process for you by duplicating and routing audio for you. By performing this process manually, you can create as many global returns as you like.


The issue is that your project will quickly start burning through CPU so it's a good idea to freeze tracks, as well as group together all of the tracks you duplicated so that your project doesn't become a mess.
Map Multiple Parameters to a Single Knob
My favorite section of the Audio Effect Rack is the Macro Control Panel. This section is toggled by clicking on the icon that looks almost like a power symbol.

Within this section you're able to map many different parameters within an audio effect rack to a single knob. To do this, right click on a scaleable parameter and select “Map to Macro 1". The macro control will now take over control of the original parameter.


To map a second macro to the same knob, right click on another scaleable parameter and select “Map to… [whatever Macro 1 has been renamed to].” You can map more than two macros to a single knob. This becomes extremely useful when performing live. It allows you to create intricate FX chains that map to a single knob. You can have up to 8 FX chains assigned to a MIDI controller, or more with the use of additional audio effect racks.
To change the value that these knobs move between, select “Map” to the right of the audio effect rack’s name. The section that appears allows you to change the minimum and maximum values of the the parameters you have set to different macros.

In this mode, you are also able to select any green-highlighted parameters and then select “map” beneath the macro of your choice to map the selected parameter to the selected macro.

Swap Chains During a Live Performance
Up above the chain section there are two buttons, one labeled “Chain” and the other labeled “Hide.” Select “Chain” to bring up the Chain Select Editor.

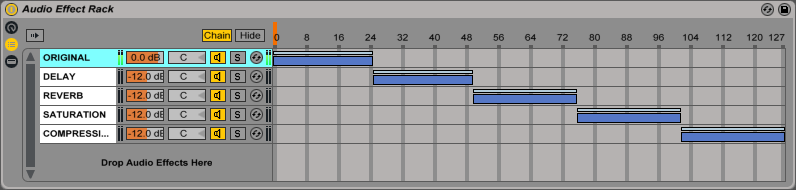
In this section, you are able to assign these blue bars, also known as zones, to different ranges. By moving the orange slider, also known as the Chain Select Ruler, above this section, you select how much signal from each chain is played back.
To switch between audio effect racks in a live setting, map the Chain Select Ruler to a macro control knob. To access this during a live performance, MIDI map this knob to a corresponding knob on your MIDI controller. Doing this will allow you to easily cycle through audio effect racks. This is also incredibly useful if you're using instrument racks. If you're playing the keys and you need to cycle through different synths and processing chains, you now know how.
By dragging out the zone of each range, right clicking on one of them and selecting “Distribute Ranges Equally,” you are able to evenly distribute the zones you have defined in the zone editor.
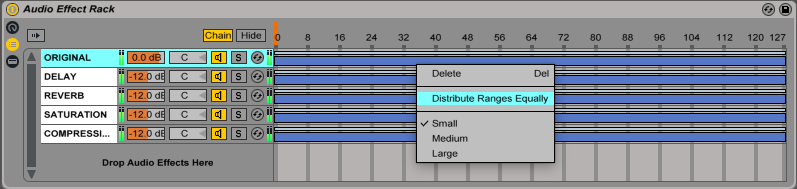
The ranges will be distributed from the smallest to largest value you have selected in the zone editor.
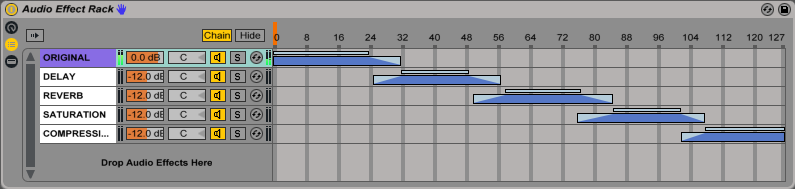
By moving the light grey bar, also known as the fade range, above the zones, you are able to create fades, smoothly transitioning from one chain to the next.
In the top left corner of the chain list, there is a little arrow pointing to the right, known as Auto Select. When this button is activated, the Chain Select Ruler will highlight any chain beneath it. This feature will allow you to do things like select all the chains of a certain value and move them at the same time across the Zone Editor.
Audio effect racks are extremely powerful and provide you with tons of creative possibilities. On top of providing you with alternative routing options, effect racks set Ableton apart from the herd when it comes to live performance capabilities.
Want to produce radio-quality songs using Ableton Live? Check out Black Ghost Audio's Music Production for Beginners video course. Produce three songs from start to finish and learn the skills you need to write, record, mix, and master music at home. No experience required. Click here to learn more and produce your first song in under an hour.


