
Pitch correction software can be used in both subtle ways and in excess. When used moderately, it can tighten up phenomenal vocal performances. With a bit more of a time commitment on the engineer’s end, pitch correction software can also save lack-luster performances.
When applied generously, pitch correction can morph from a vocal assistance tool into a full-blown effect. People expect a vocalist to sing in tune, but if you remove enough of the natural variations in pitch from a singer's performance, you end up with a robotic effect; in some cases, this is precisely the effect you want, and in others, it may not be.
Being able to choose between natural pitch correction and hard-tuned pitch correction is an incredibly valuable ability, but to do this, you need to build up your technical knowledge. If you’re going the natural pitch correction route, you want a vocal recording to sound as organic as possible. Alternatively, if you take a vocal in the opposite direction, you want the robotic vocal to sound like it's intentionally been processed that way. It’s easy for a listener to tell if pitch correction has been applied poorly.
The two plugins I’ll be walking you through include Celemony’s Melodyne and Antares’ Auto-Tune Pro. Melodyne excels at natural pitch correction, while Auto-Tune lets you achieve classic T-Pain style vocals. Both software can apply natural and robotic pitch manipulation, but there are a couple features I’m about to discuss that give each device an edge over the other.
If you've never used Melodyne or Auto-Tune before, the basic pitch correction sections of this guide will help get you started. The advanced sections will be more suitable for readers looking to take their pitch correction game up a notch.
How to Apply Natural Pitch Correction
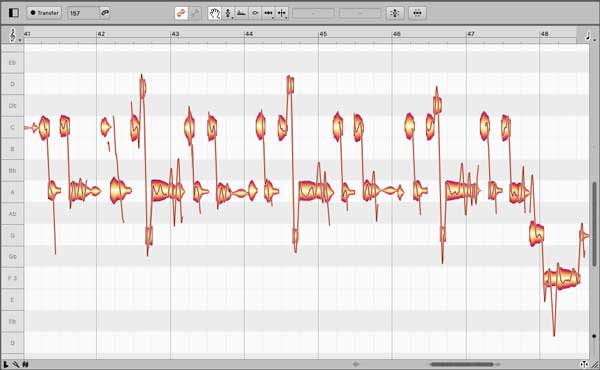
Melodyne automatically slices up the waveform of your audio into notes, which are represented by orange blobs. The specific note each blob is playing is indicated along the left side of Melodyne’s workspace. By moving these blobs up and down within Melodyne’s workspace, you change their pitch, and by moving them side-to-side, you affect their position in time.
Basic Pitch Correction with Melodyne
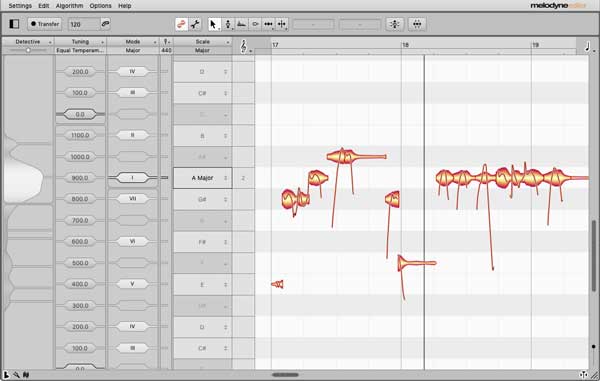
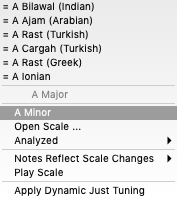
You can set Melodyne’s key by clicking on the Scale Editor Depth button in the bottom left corner of the interface. From here, click on the key your song is in, and select the mode (major, minor, etc.).
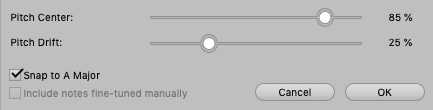
If you want to apply pitch correction to a set of notes, highlight them in the workspace by clicking and dragging a box around them, or press [CMD] +[A] to highlight all the notes you’ve recorded. Click on the Correct Pitch Macro button at the top of Melodyne and dial in the settings how you’d like.

You can also click on the Quantize Time Macro button to automatically snap notes to a specific note value.

Setting the key of your song and quantizing the pitch and time of your notes is probably going to sound alright, but there will very likely be sections that need more attention.
When you right-click in Melodyne’s workspace, a menu pops up containing different tools. The first section of this menu includes the Main Tool, Scroll Tool, and Zoom Tool. The Main Tool allows you to highlight blobs, and modify their pitch. To change the pitch of a note, click and drag on it to move it up or down by one semi-tone at a time. You can modify pitch two cents at a time by holding down option while dragging on notes.

Navigating around Melodyne’s workspace can be challenging at first, but two key commands are going to make this much more manageable. [CMD] + [Shift] activates the Scroll Tool, which allows you to drag the viewfinder around the workspace.

[CMD] + [Option] activates the Zoom Tool, which allows you to zoom in and out on blobs when you click and drag up and down, as well as left and right.

The line running through these blobs is known as the pitch curve. It changes continuously over time and indicates natural fluctuations in the pitch of your vocalist’s voice. If you reduce the modulation amount of this pitch curve, you start to achieve a robotic sound, but that’s not what we’re going for here.
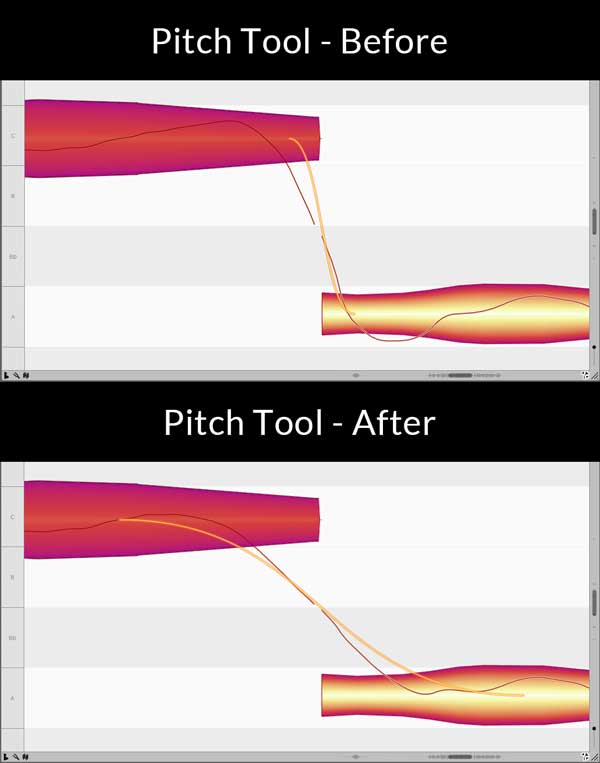
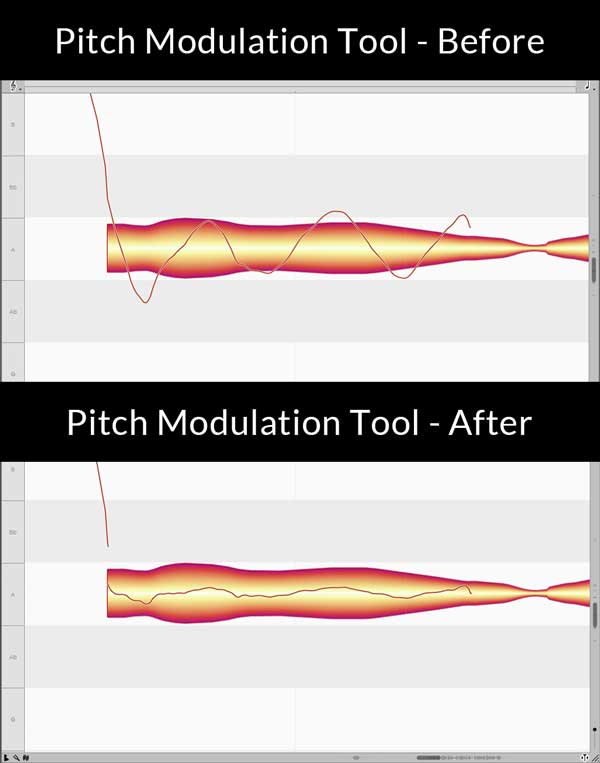
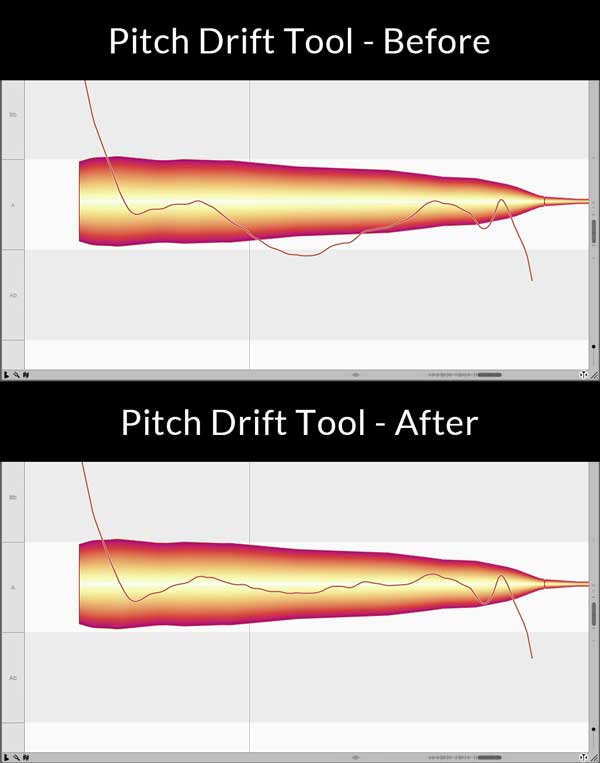
Using Melodyne’s Pitch Tool, you can manipulate how the pitch of notes glide into one another. The Pitch Modulation Tool lets you tame or exaggerate vibrato, and the Pitch Drift Tool allows you to deal with notes in which your singer has drifted slightly sharp or flat over time. These three pitch correction tools are the bread and butter of Melodyne; they allow you to make all kinds of small pitch adjustments, and are one of the primary reasons Melodyne is exceptionally good at natural pitch correction.
In the following example, you'll see that the pitch tool has been used to create a gradual pitch shift over time. Adding fluid pitch bends to a vocal can make it seem more organic.

Many professional singers can deliver controlled, natural vibrato, but this is a rather advanced singing technique. An amateur singer may be able to apply vibrato to their voice too, but if the pitch of their voice modulates too much, the recording can become a mess. To reduce vibrato, you can use the pitch modulation tool; it works great for emphasizing natural vibrato as well.

Pitch drift occurs when a vocalist falls off the note they're trying to hit; this happens quite often at the end of vocal passages when a singer starts to run out of air on an elongated note. In the following example, the vocalist goes a bit flat in the middle of the note they're trying to hit. Using the Pitch Drift Tool, you can get wavering vocal performances back on track.

Advanced Pitch Correction with Melodyne
Qualities like timing are just as important to a natural sounding vocal performance as pitch. Sometimes the pitch tools won't work the way you want because the timing of the performance is off. If you run into this issue, try experimenting with some of the following tools.
People sound different than one another because of the way their vocal tracts are constructed; the Formant Tool allows you to change the spectral shaping of each note to modify the timbre of your singer's voice. When pushed to the extremes, this tool allows you to create nasally Alvin and the Chipmunk type vocals, or turn female vocals into deep male vocals. To be clear, the Formant Tool doesn’t modify pitch, it affects timbre.

The Amplitude Tool changes the level of individual notes, which can save you from having to draw in volume automation using a utility later on. I usually record on the way into my DAW with an analog compressor, so if I have to use the Amplitude Tool, it’s in moderation.

Using the Time Tool, you can shift blobs forward or backward in time by a quarter note. Holding down [Option] allows you to shift notes across a grid with a much finer resolution. You can use this feature to correct a vocalist’s timing if they’re a bit early or a little late during certain sections. If the entire recording is early/delayed, you’re better off just modifying the delay time of the entire vocal using a track delay in your DAW.

The Time Handle Tool allows you to set up handles that are reminiscent of warp markers, which you’re probably familiar with if you use Ableton. These handles allow you to apply time compression/expansion to individual notes. If you expand the left side of the note that you’ve applied a handle to, you’ll end up applying time compression to the right side of the handle.
When a vocalist rushes into words, you can use the Attack Speed Tool to correct the timing; it stretches out the beginning of the blob you’re affecting to correct the timing of the attack, and automatically affects the timing of surrounding blobs by accommodating the change. This tool has a tremendous impact on how natural a performance sounds.

Sometimes Melodyne will clump two different notes into a single blob; this is why it's important that you use your ears. The Note Separation Tool lets you split blobs apart. To cut a blob in half, just double click on it. You can then modify each blob independent of the other.

The Note Separation Type tool allows you to select between hard and soft note separations by double-clicking on separation lines. A hard separation completely detaches blobs from one another, while a soft separation detaches blobs, but keeps their pitch curves linked together, allowing you to still affect how the pitch of the first note bends into the pitch of the second note. You can always turn a soft separation into a hard one, but you can only turn a hard separation into a soft one if it was previously a soft separation.

There are more settings you can get into by referencing the Melodyne User Manual, but these primary tools are going to get you quite far, and should be adequate in a majority of situations. For example, Melodyne offers polyphonic and percussive pitch correction algorithms, but these features fall outside the scope of this guide.
How to Apply Robotic Pitch Correction
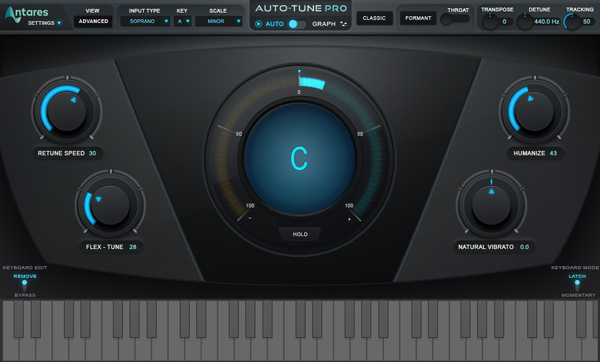
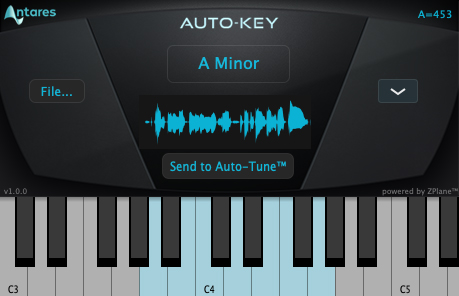
Auto-Tune Pro has four big knobs and a giant pitch meter. Compared to Melodyne, Auto-Tune is mostly pretty simple to use. It comes with a secondary plugin called Auto-Key. When you play back a vocal, Auto-Key automatically detects the key, and then lets you send it to Auto-Tune; this lets you get Auto-Tune set up quickly. Alternatively, you can set the key and scale of your song in Auto-Tune manually.
Basic Pitch Correction with Auto-Tune
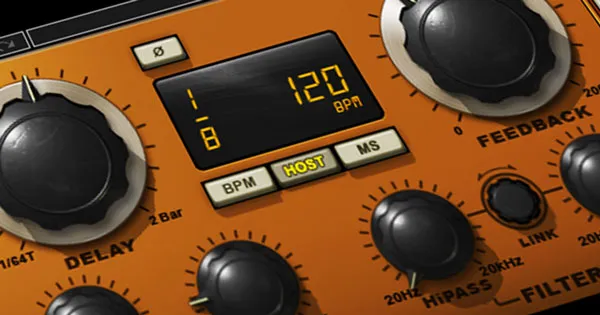
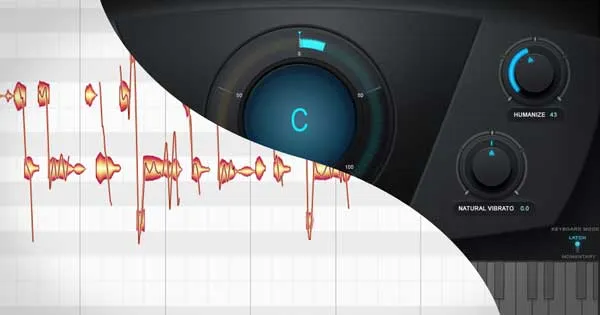
Retune Speed sets the rate at which the input audio is moved to the target pitches; it’s basically the robot knob. When set to 0, the pitch drift between notes will almost be non-existent, snapping the performance from one note to the next. Dialling back the Retune Speed or adjusting Auto-Tune’s other parameters can help relax this effect.
Increasing Flex-Tune allows for more pitch variation, which can be used for expressive purposes. This knob affects how much pitch correction is applied, with higher values decreasing the amount.
To add realism to sustained notes at high retune speeds, you can use the Humanize knob. This knob helps Auto-Tune differentiate between short notes and sustained notes, allowing you to apply a slower Retune Speed to just the sustained notes.
There’s a little trick to setting up Humanize properly. Set Humanize to 0 and Adjust Retune Speed until the shortest notes in the performance are in tune. The longer notes that are sustained will probably sound too static now, which is fine. Slowly increase the Humanize amount until the sustained notes adopt the natural variations in pitch found in the original performance.
Natural Vibrato will minimize or accentuate vibrato found in the original performance. By clicking on View: Advanced, you activate a secondary menu that allows you to create custom vibrato. By default, Shape is set to (NO VIBRATO), meaning no vibrato is synthesized. However, if you set Shape to either SINE WAVE, SQUARE, or SAWTOOTH, Auto-Tune will apply its own vibrato to your material, based on the settings you’ve input.
The Advanced view also lets you bypass and remove certain notes from the scale you’ve set, allowing you to create your own custom scales.
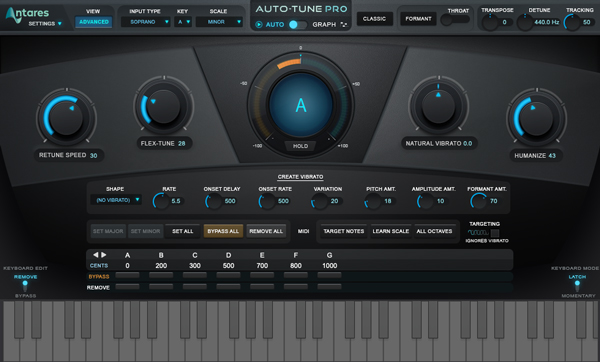
Clicking on "CLASSIC" will allow you to capture the sound produced by Auto-Tune 5. Seems a bit random, right? Well, people were obsessed with the sound of Auto-Tune 5; to the point where Antares decided to add this processing option back into the newest version of the plugin. If you want that true, authentic, T-Pain sounding robotic vocal effect, make sure you've engaged Auto-Tune Pro's "CLASSIC" mode.
Advanced Pitch Correction with Auto-Tune
Compared to Melodyne, Auto-Tune is quite easy to use, with the exception being Auto-Tune’s Graph. The Graph is similar to Melodyne’s workspace, and functions in a somewhat familiar way, but the workflow is less streamlined in my opinion. To overcome this issue, I usually apply natural pitch and time correction using Melodyne, and then follow it up with Auto-Tune, using it purely as an effect.
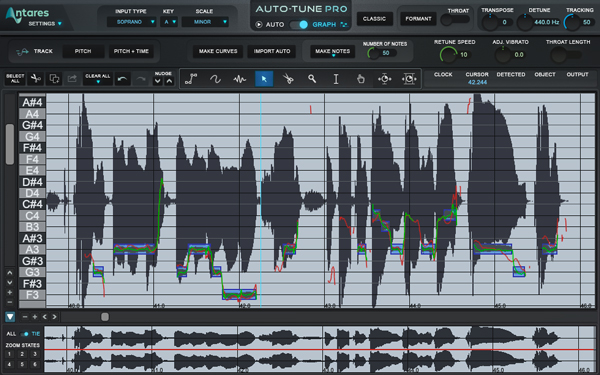
To record audio into the Graph, you need to click on Track: Pitch, or Track Pitch + Time. My next piece of advice is to click on the Make Notes button; this will provide you with little blocks that are similar to Melodyne’s blobs.
Automation is something you don’t hear a lot of people really emphasize when it comes to Auto-Tune, but it can mean the difference between a pile of hot garbage and a masterpiece. Slamming a vocal with a low Retune Speed throughout the entirety of a track gets boring in my opinion. You’ll often benefit more from accenting the end of certain phrases with heavy pitch correction by automating settings like Retune Speed, or Natural Vibrato. Treat Auto-Tune like you would any other effect, and use it tastefully.
Some artists will request that you allow them to sing with live Auto-Tune applied. Auto-Tune can be played almost like an instrument if you’ve practiced singing through it enough. While the results can turn out great if your vocalist knows what they’re doing, this recording method can also yield a complete train wreck if you’re recording an inexperienced singer. I'm not saying you shouldn't record this way, just be careful about artists trying to Auto-Tune as a crutch.
Getting good at applying pitch correction takes time. It’s a skill that needs to be developed just like any other, and requires you to have a full understanding of the software you’re using. On top of this, developing your sense of pitch through apps like Quiztones or EarMaster will help you nail down the nuances that aren’t displayed as obviously in Melodyne’s interface.
Many professional engineers will outsource pitch correction to a third party. It’s quite a time consuming process, and if you have the budget to get someone else to do it, it may be worth it. Someone who sits around all day, every day, pitch correcting vocals is going to be pretty good at it. They usually charge on a per track basis, so it can be relatively affordable if you don’t have tons of vocal stacks.