


If you record a sound into your computer using a sample rate that is too low, a type of sampling error can occur known as aliasing. By definition, and in regards to audio, aliasing is the misidentification of a signal frequency. Aliasing is a simple issue to overcome, but first you need to learn about the concepts surrounding it and how to recognize it.
Storing Data
A wave of compression and rarefaction that is propagated by an elastic medium such as air is called a sound wave. It’s produced by a sound source; something that displaces the air around it. A sound wave will contact your ear drum, which then sends a signal to your brain for your brain to interpret. This is a straight forward process, but how on earth are you meant to record a sound wave as data in your computer?
AD/DA Conversion
The first thing you'll need is a quality AD/DA converter. An AD (analog to digital) converter is going to allow you to convert analog signal into a digital format. A DA (digital to analog) converter is going to allow you to convert stored digital information into an analog format. Your computer has a built in sound card that's capable of performing AD/DA conversion, but most music professionals opt to buy an audio interface specifically for this purpose.
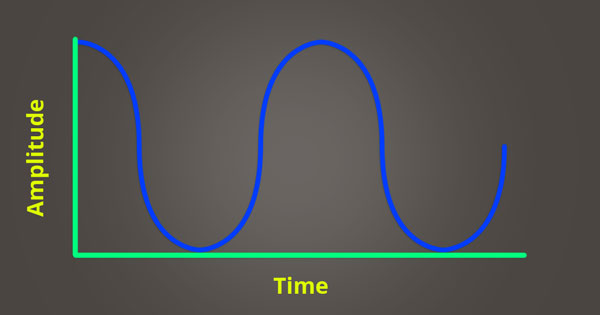
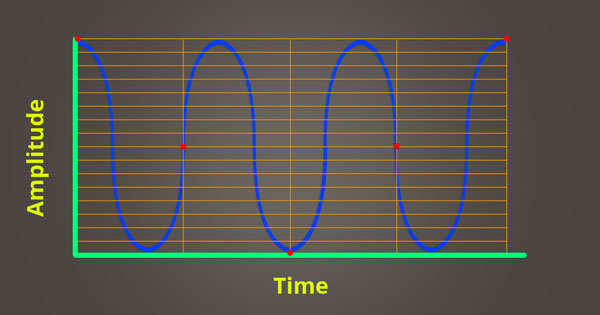
The image below represents a continuous analog sine wave that you’re trying to record digitally. The peak of the sine wave indicates high pressure (compression), while the trough of the sine wave indicates low pressure (rarefaction).
Time and Amplitude
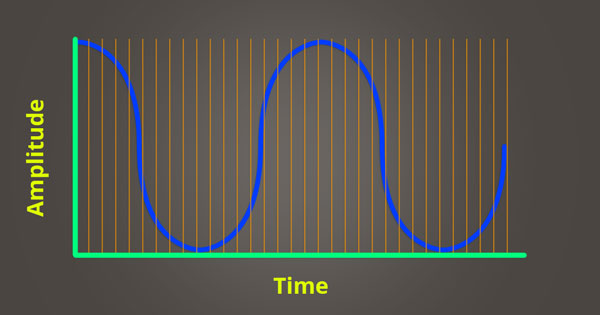
Knowing that your computer is going to need some data (in the form of numbers), you can assign two values to the sine wave; time and amplitude. If you consistently sample the amplitude level of the continuous analog sine wave over time, you can store this data and call upon it at a later time (such as when you want to play back what you've recorded).
Sample Rate
Sample rate is the number of times you choose to sample an analog signal over the span of one second. You’re essentially telling your AD (analog to digital) converter how often you want it to take a snapshot of the continuous analog signal. The higher your sample rate, the more the analog signal is sampled over the span of one second. Common sample rates include 44.1, 48, 88.2, 96, 176.4 and 192 kHz.
Bit Depth
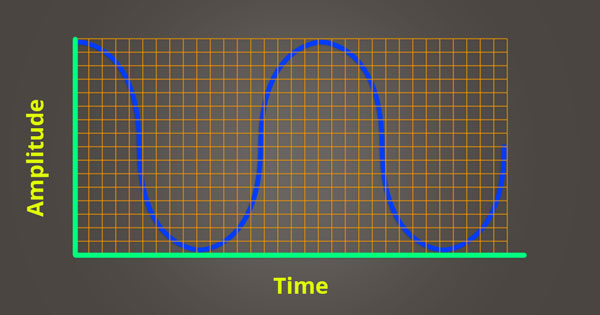
It’s been determined that the X coordinate (time) can be mapped easily enough, but what about the Y coordinate (amplitude)? This is where bit depth comes into play; you need to tell your computer at what resolution you’d like it to record amplitude.
In the analog realm, amplitude can take on an infinite number of values because wave forms are continuous; in the digital realm you need to limit these values. A big reason for doing this is to keep files a manageable size. The following are two of the most commonly used bit depths, along with the number of amplitude values that they’ll allow you to assign to a single sample. To calculate the amplitude resolution for a given bit depth, you use the formula 2 to the power of n, where n is the bit depth.
- 16 bit = Resolution of 65,536
- 24 bit = Resolution of 16,777,216
The only difference in audio quality between a 16 bit file and a 24 bit file, if you've applied dither, is the amount of noise. Dither helps to eliminate quantization error. To test this, you can phase cancel your 16 bit file and 24 bit files with one another; the result is just noise. If anything else were different, you would hear it. Many songs have a bit depth of 16 because it keeps the file size down, and 16 bit 44.1kHz was the format required for CDs back in the day. Now, a bit depth of 24 is mostly used when uploading songs to streaming services like Spotify and Apple Music; this is important to know when mastering your music for streaming services.
By plotting points along the path of the analog signal, you end up with a series of data points that resemble the path of the original analog signal. As you may have noticed, there are spaces between crossover sections in the grid that you can’t use because the sample rate and bit depth don’t allow for it. If a point were to land in one of these spaces, it would be quantized to the nearest X-Y crossover point.
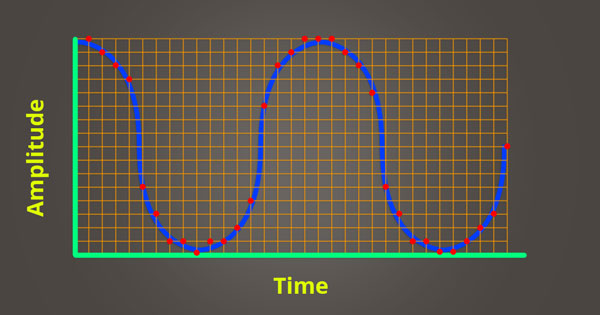
You'll notice in the example above that hardly any of the points actually fall perfectly on the continuous sine wave. The amplitude of each sample is quantized to the nearest possible value; the inaccuracy that results of this is known as sampling quantization error. To limit the negative effects of sampling quantization error, you can increase your sample rate and bit depth; the result will be a signal that is truer to the continuous analog sound source.
Recalling Data
Your computer stores the data that it collects from the process of sampling and can call upon the information when it needs to use it. One of the biggest benefits of storing audio digitally is that once it's been recorded it never degrades. The same can't be said for physical storage formats such as tape and vinyl.


Now that you have this sine wave stored digitally, you're probably going to want to play it back through your studio monitors. DA (digital to analog) conversion has to now take place, which is exactly the opposite of AD (analog to digital) conversion. The converter uses the stored information to construct an analog signal and this signal gets sent to your speakers.
If the sound you sampled wasn't recorded with a sufficient sample rate and bit depth, the reconstruction of the original analog signal may be inaccurate when D/A conversion occurs.
Examples of Aliasing
Aliasing is the distortion that occurs when the signal reconstructed from samples is different from the original continuous signal. If the analog signal wasn’t sampled frequently enough over time, there are two forms of aliasing that can take place. Either there will be silence:


Or the signal will be recorded as if it were a lower octave, completely misrepresenting the original signal:

What Aliasing Sounds Like
This following video demonstrates the audible effects of aliasing and quantization error. As you listen, keep in mind what you've learned so far.
How to Prevent Aliasing
In physics, there’s something known as a Nyquist frequency; this is the frequency you’re trying to accurately represent via digital recording. The range of human hearing is roughly 20-20,000Hz, so it makes sense to choose a Nyquist frequency above this audible range. For the sake of example, let’s say you’re trying to accurately represent 22,000Hz (Nyquist frequency).
The Nyquist rate is the sample rate required to accurately playback the Nyquist frequency. The Nyquist rate needs to be more than twice that of the Nyquist frequency. If you choose a Nyquist rate of 44,100Hz, that’s enough to accurately playback 22,000Hz because its more than double the Nyquist frequency.
44,100Hz seems familiar doesn’t it? This is one of the lowest sample rates that your audio interface is capable of recording with; recording with a sample rate lower than this can result in aliasing. To prevent aliasing you need to record with a sample rate that is more than twice that of the highest frequency you wish to hear.
How to Remove Aliasing
It’s pretty uncommon that you run into an aliasing issue within your DAW, but it’s definitely not unheard of. Some plugins can manipulate sample rate and cause aliasing issues to occur (like in the video above). To remove aliasing, you need to use an anti-aliasing filter. Quite often, an anti-aliasing filter takes the form of a low pass filter. The issue here is that when you cut the problematic frequencies, you also cut the desirable frequencies above the cutoff point. The best way to deal with aliasing is by preventing it, but if you can’t, your next best move is to apply an anti-aliasing filter.
Want to produce radio-quality songs? Check out Black Ghost Audio's Music Production for Beginners video course. Produce three songs from start to finish and learn the skills you need to write, record, mix, and master music at home. No experience required. Click here to learn more and produce your first song in under an hour.


