


If you've never touched Ableton before, but want to get started with it, you're in the right place. First, I'll walk you through Ableton's interface and get you familiar with where different key features are located. Second, I'll show you a great method to build your first song in minutes. I'll be giving a brief overview of Ableton, so if there's something you find interesting you at least know it exists and can further research it from there. There's no other way of saying this, but you're about to belly flop right into Ableton.
1. Info View
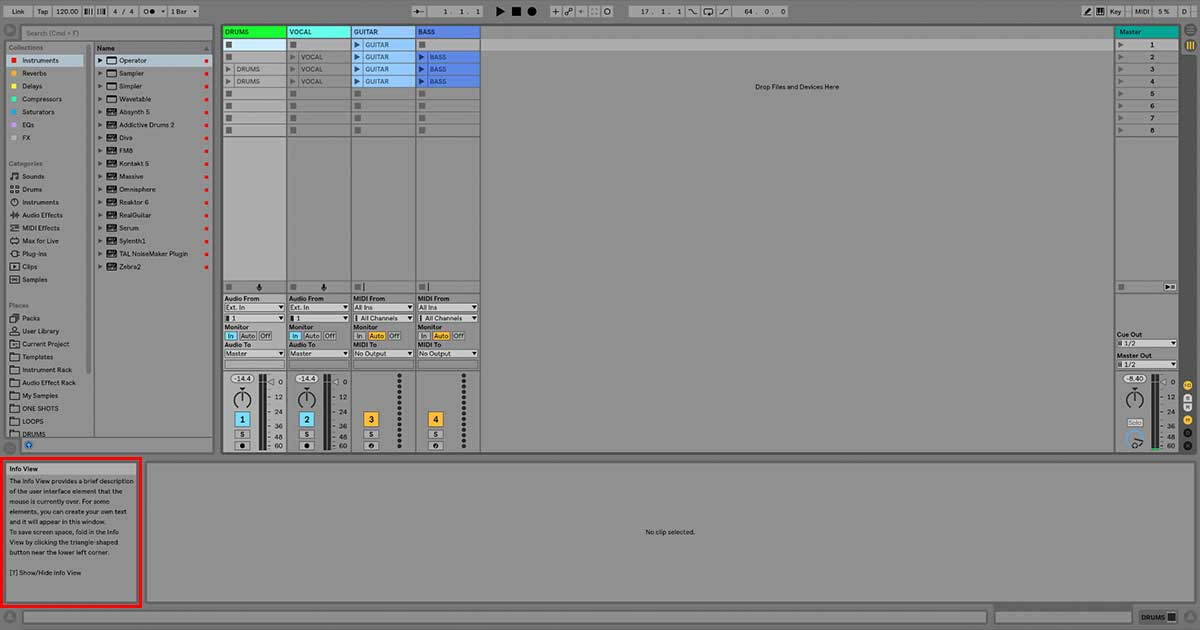
This little section can be shown/hidden by clicking on the disclosure triangle in the bottom left corner of Ableton. If you don’t know what something in Ableton does, hover your mouse over it and a tooltip will appear in this window providing you with further information about it.
Keep Info View toggled on at all times when starting out. It can provide you with quick answers to questions you may have regarding Ableton, and save you hours of online research.
2. Global Controls
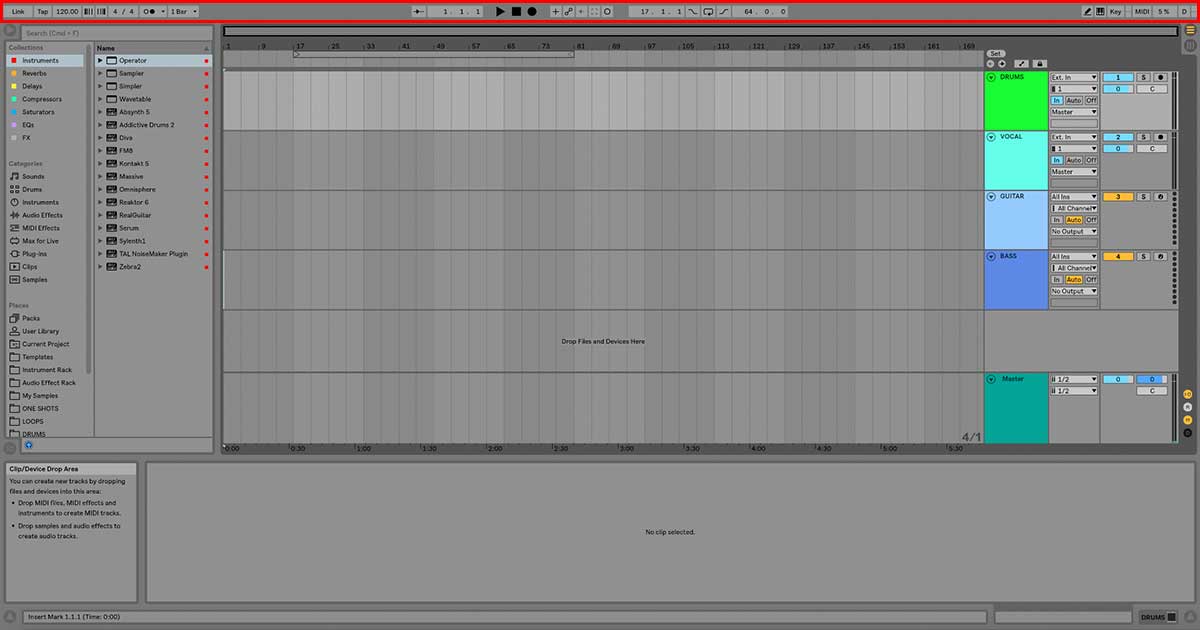
Tempo Controls
In the top left corner of Ableton, you have your tempo controls. You can speed up or slow down your entire track, as well as adjust the time signature.
Playback Controls
Located to the right of the tempo controls, the playback controls allow you to play, stop, and record audio.
Loop Controls
It's quite typical to work with loops in Ableton (as I'm going to show you below). The loop controls allow you to determine how you'd like Ableton to record MIDI/audio when passing through the loop bracket. New in Ableton Live 10, [CMD]+L will toggle the loop bracket on and off.
CPU Load Meter
Although this little "%" in the top right corner of your screen doesn't look too important, it is! If this value starts to push past 50%, you'll start to hear playback issues as a result of your computer approaching an overload. This doesn't mean your computer is going to explode, but it does mean that it won't be able to properly playback audio. Using numerous tracks with CPU intensive plugins will cause this meter to skyrocket and potentially cause Ableton to crash.
3. Workspace Views (Session/Arrangement)

Session View
Session view is meant for live performance applications. It functions by allowing you to launch clips and scenes at different points in time. The live arrangements you create in session view (by implementing clips and scenes) can be recorded directly into arrangement view for further editing. To record your session view performance, enable the record button found in the playback controls section and launch a clip or scene to begin recording.
Arrangement View
Arrangement view allows you to build songs from left to right over time. It displays your entire song right in front of you and allows you to easily automate time-based parameters.
Clips
Clips are the colored blocks that you can create on either audio or MIDI tracks. To create an audio clip, drop an audio one-shot or loop into a blank clip slot. To create a MIDI clip, double-click on an empty clip slot. To playback a clip, click the play icon to the left of the clip you are trying to trigger. To stop playback, click the block icon above the in/out section of the track you are working with.
Scenes
Where you place your clips is important because you can trigger multiple clips that are lined up horizontally with one another. When you trigger a scene, you are actually triggering multiple clips at the same time.


To trigger a scene, click one of the play icons on the master channel; it will launch all of the clips that are in it's row. To stop playback, click the block icon above the in/out section of the master channel.
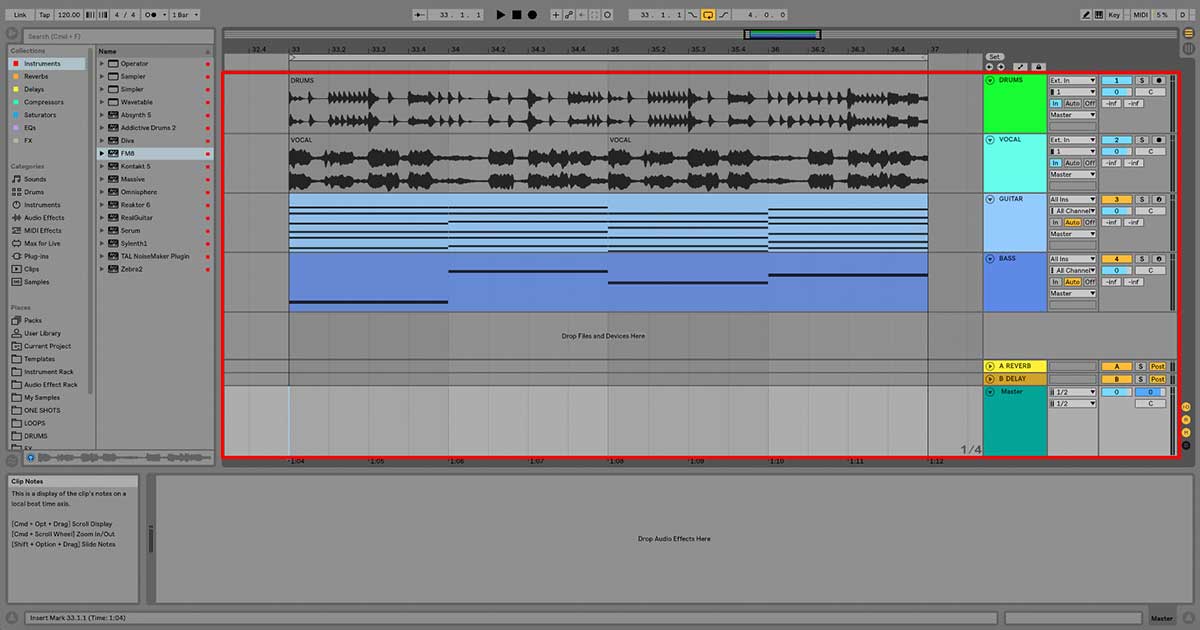
Track Display
The track display is where you record your audio and MIDI clips in arrangement view. Once you've record armed a track and clicked on the global record button, the audio/MIDI information will be captured here.
In/Out Section
The In/Out section is where you can route audio in creative ways. You can route audio between tracks, have it bypass your master channel, and you can even route audio through external analog gear.
Monitoring Section
When monitoring is turned on, a track's input is played through it's devices and heard at it's output. In Auto mode, input monitoring will automatically be turned on when the track is record armed, and turned off in order to play clips.
Mixer Section
This section contains gain, pan, solo, mute and track recording controls.
4. Browser
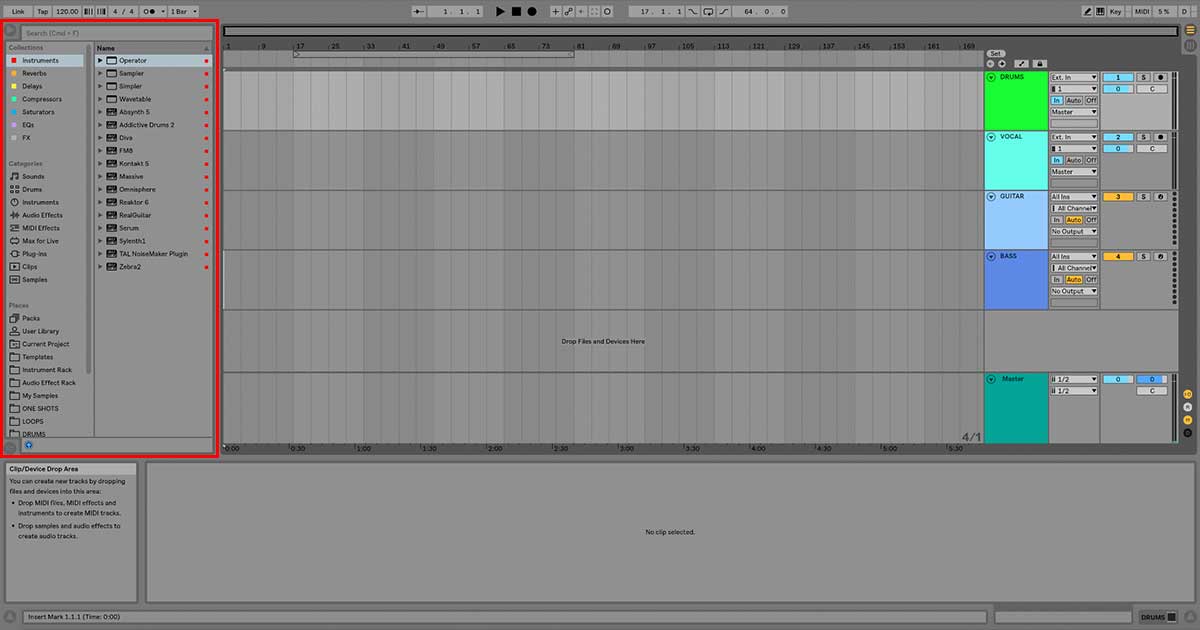
Search
The search bar at the top of the browser can be quickly accessed by using [CMD]+[F]. The search function allows you to search Ableton's directory for relevant content. This is very useful if you have a large plugin library, or if you're trying to find a specific sample.
Collections
Ableton Live 10 brings a whole new way of sorting your favorite and most used instruments, devices, and samples. By right clicking on an item in your browser and tagging it with a color, it will appear in the collection you've selected. This allows for easy access to your essential production tools.
Sounds
In this menu, you’ll find all of your Instrument Racks and instrument presets, organized by the type of sound they make.
Drums
In this menu, you’ll find all of your Drum Racks, which include full drum kits and individual drum hits.
Instruments
In this menu, you’ll find all of your Instrument Racks, as well as raw Live devices and their presets.
Audio Effects
In this menu, you’ll find all of Ableton’s audio effects and their presets, as well as Audio Effect Racks.
MIDI Effects
In this menu, you’ll find all of Ableton’s MIDI effects and their presets, as well as MIDI Effect Racks.
Max for Live
In this menu, you’ll find all of your Max for Live devices and presets.
Plug-Ins
In this menu, you’ll find all of your third-party plugins. Plugins are third-party software you can download that allows you to perform functions, that are in some cases, impossible with Ableton’s native devices.
Clips
In this menu, you’ll find all of your installed Live Clips. You can drag and drop these clips into your session view to start making music with loops right away.
Samples
In this menu, you can access all of your samples. However, I would recommend you organize your samples on an external hard drive and create your own folder hierarchy. You can add your custom sample folder to the browser window by clicking “Add Folder…” in the bottom left-hand corner of the browser window.
5. Track Types
Audio Tracks
Audio tracks allow you to record, playback, and process audio files. To record audio, record arm your track by clicking the Arm Session Recording button and then click the global record button to start recording audio. To use samples you’ve found online, simply drag them out of your browser and into an empty clip slot in session view, or into the track display area of an audio track in arrangement view.
Audio Clips
Audio clips allow you to edit the audio they contain by affecting their pitch and time. To open and edit an audio clip, double-click on it in session or arrangement view. Most notable is the “Warp” feature which allows you stretch audio to match the tempo of your track. Experiment with different warp modes until you find one that gives you the desired results.
MIDI Tracks
MIDI tracks allow you to load playable virtual instruments that are triggered by MIDI notes. To create a MIDI track press [CMD]+[Shift]+[T].
MIDI Clips
By creating MIDI clips on MIDI tracks you can draw in MIDI notes. To create a MIDI clip in session view, double-click on an empty MIDI clip slot.
To create a clip in arrangement view, highlight a section of time by clicking and dragging over it, then press [CMD]+[Shift]+[M]. To open and edit a MIDI clip, double-click on it in session or arrangement view.
MIDI Note Editor
The MIDI Note Editor allows you to program MIDI notes by either performing them on a MIDI keyboard (your computer's keyboard can be used as a MIDI keyboard by enabling this feature with [M] in Ableton Live 10) or drawing in notes with using the pencil tool [B]. These notes will be played by the virtual instrument you have loaded onto the MIDI track.
Device View
This view shows you which MIDI effects, audio effects, and plugins are loaded onto your tracks. To quickly swap between clip view and device view, use [Shift]+[Tab].
Groove Pool
Ableton's groove pool allows you to add various amounts of swing to your MIDI and audio clips.
Return (Aux) Tracks
A return. or aux track. is a track that busses different signals together. To send audio from a track within your session to a return track, turn up the Send corresponding to the return track in the mixer section. To create a new return track press [CMD]+[Alt]+T. Returns are typically used to perform parallel processing.
Master Channel
All of your tracks will buss together on this channel before leaving your DAW. If you wish to apply processing to your entire song, this is the place to do it.
6. Write Your First Song
If you’ve never touched a DAW before and want to start writing music as quickly as possible, you’ll want to start off working in session view. The goal is to layer different clips together within session view and end up with some loops that you like. A lot of tech house producers actually come up with full song ideas in session view because the genre is based heavily around loops. If you're using Ableton for live performances, you can learn how to create live loop performances here.
To take it one step further, you can record your loops into arrangement view by record arming your session and launching the scenes you wish to record. This will capture the performance in arrangement view. From here, you can develop your song further and provide it with structure in arrangement view.
I don't personally use session view to write songs. I find that I develop fuller ideas if I start and finish a song within arrangement view. It's also easier to manipulate audio over time in arrangement view because of the way you can easily draw in various types of automation. After experimenting with Ableton for a few days, you'll be able to decide which method works best for you.
7. Export Your Song
Now that you've written your first song, it's time to export this majestic beauty. Pull up the Export Audio/Video window by pressing [CMD]+[Shift]+[R]. Select the export settings that you'd like and then click "Export." Choose the location you'd like to save your file and then wait! That's all there is to it.
There are plenty more features available in Ableton than what I've covered here, but this is enough to get you started. Hopefully, learning learning this DAW isn't as scary as it was before. Ableton allows for a ton of creative possibility but it comes at the expense of a steep learning curve. I highly recommend you stick with it because it will pay off in the long run. I've used Ableton, Logic, FL Studio and Pro Tools. They each have their own ups and downs, but I can' get away from Bae-bleton. She's always been a faithful one.
Want to produce radio-quality songs using Ableton Live? Check out Black Ghost Audio's Music Production for Beginners video course. Produce three songs from start to finish and learn the skills you need to write, record, mix, and master music at home. No experience required. Click here to learn more and produce your first song in under an hour.


